Overview
This article reviews the overall process and best practices for updating CIMcloud data using a spreadsheet imports and how this data can be reviewed using table specific downloads.
Overall Concept of Spreadsheet Imports
Spreadsheet imports allow CIMcloud workers with access to be able to update or add large numbers of records without having to update each record individually through the site U/I (User Interface).
A spreadsheet can be created that is uploaded to a specific CIMcloud table and this adds/updates records based on the record ID field. You could also use the record key but this is not recommended as this is not a user friendly field and if you use the ID and Key fields there is a chance of creating a duplicate records.
When the upload is processed, the system looks at the ID field. If the ID matches an existing value, the record is updated; however, if the ID does not match an existing record, a new record is created.
The first row (header) of the spreadsheet must contain the fields being used/updated and these must match the database field name. Since these are database field names, they will never contain spaces.
There are sample uploads for common tables at the end of this article. Other articles on specific processes, or features, may contain examples spreadsheets.
Most common tables also contain downloads (described below), and can be used to help identify field names. Be careful re-using the exported download without reviewing, as there may be fields you do not want to update. For example, an exported table always contain the record/primary key, as mentioned above you want to avoid including the record/primary key with uploads.
Virtual Fields
Virtual fields are fields that can be used on the import that can map the uploaded record to multiple other records (like mapping a list of products to a product category). You can enter a semicolon delimited list of values in the virtual field and the import process will create mapping records for each of the values in the semicolon delimited list. As explained below when processing you will have the option with these to add the mapped values to record in addition to any already mapped or replace all the existing mappings with just the ones on the import. The add option will just create any new mapping records and the replace option will remove all the records and create the ones from the spreadsheet. Use the replace option if you want to make sure that the only mapping records are the ones on the import. These fields will end in “_vir”. If the field does not end in “_vir” it is not a virtual field and any value in the upload will always replace the current value.
Best Practices for Spreadsheet Imports
Data that is part of the ERP sync should never by updated on the CIMcloud platform. If the specific information is synced from the ERP then it should always be updated in the ERP and then synced to CIMcloud. If updated in CIMcloud and not the ERP, CIMcloud will use the updated data until the next time the data syncs from the ERP and then CIMcloud will revert to the ERP value. This article links to specific information on what is part of the standard ERP to CIMcloud sync – Standard Data Synced Between CIMcloud and Sage 100
If you are doing a specific update/upload for the first time where you are going to be updating multiple records, it is recommended that you update one record first and review that record after the upload to validate the change you are making is correct. It is a lot easier to fix one record than 1000 if there is an issue with the upload.
Name the spreadsheet with a name that identifies what you are trying to accomplish and then save the spreadsheet somewhere. You never know when you may want to review it or for some reason need to update the information again.
Only include the fields on the spreadsheet you are wanting to update. This can help prevent accidently updating information unintentionally. If you are just wanting to add descriptions to products then only include the ID field (SKU) and the description (ds). Don’t include the column name (nm) if those are all good. You may end out updating a name you don’t want to. If the column is on the spreadsheet and it is blank, it will update the value to a blank and remove whatever value was previously populated.
Do not create a record and try to map other records to this record in the same import. If you are mapping to a record the record should already exist. For example if you are wanting to create a parent product and then map products to this record as children you cannot have a row that is creating the parent product and then child products as different lines on this sheet pointing to this parent product. The mapping to the parent product will fail since the parent product does not exist until the import is complete. You would want to first do an import of you parent products and then do a separate import of child products pointing to these parents.
Check you spreadsheet for duplicate IDs. If the ID duplicated is creating a new record the system will potentially create two records with the same ID. If updating a record the last record processed will be the update made.
When processing uploads there is an option to remove/delete records with the upload. Be very careful with this as it will delete the entire record and not just the information in the spreadsheet. So if you do a delete with a product upload it will delete all the products on the spreadsheet even ones that may be syncing from the ERP.
Processing a Spreadsheet Imports
Create the Spreadsheet
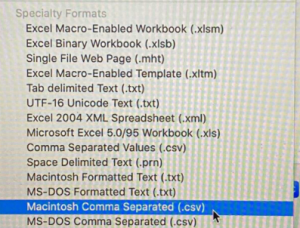
The first step in doing a spreadsheet import is to create the spreadsheet. The spreadsheet must be in Microsoft standard CSV format. If using an Apple devise select the file type shown below
PC:

Apple:
The spreadsheet must contain the the correct column headers and the ID value for the record being updated. As mentioned above it is recommended to only do one record the first time you do an upload. Each table has a limit to the number of records that can be uploaded at one time (typically 2000). Please take this into account when creating your spreadsheet. The ID fields for some of the standard tables uploaded to are:
- Accounts – ref_id
- Customers – username
- Products – sku
- product_categories – id
Importing Step 1
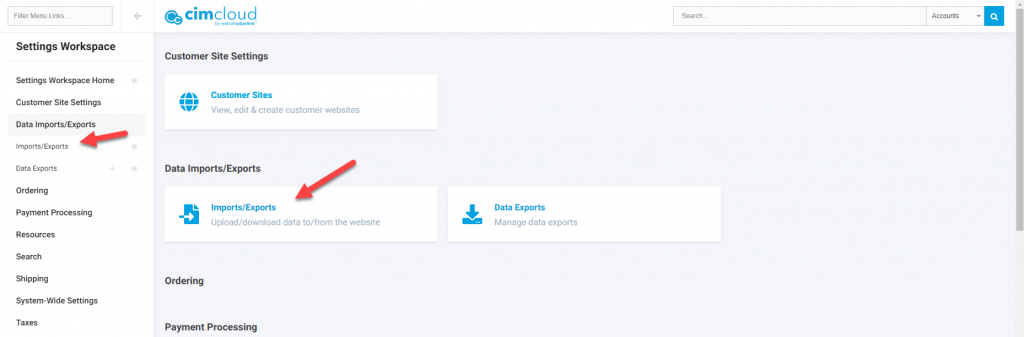
Navigate to the Imports/Exports page in the worker portal or click on the link for the specific table from the specific record content management page in the worker portal (links for uploads on some worker portal pages are available starting in release 2020.R2.2). The Imports/Exports page is on the menu at Settings Workspace > Data Imports/Exports > Imports/Exports .
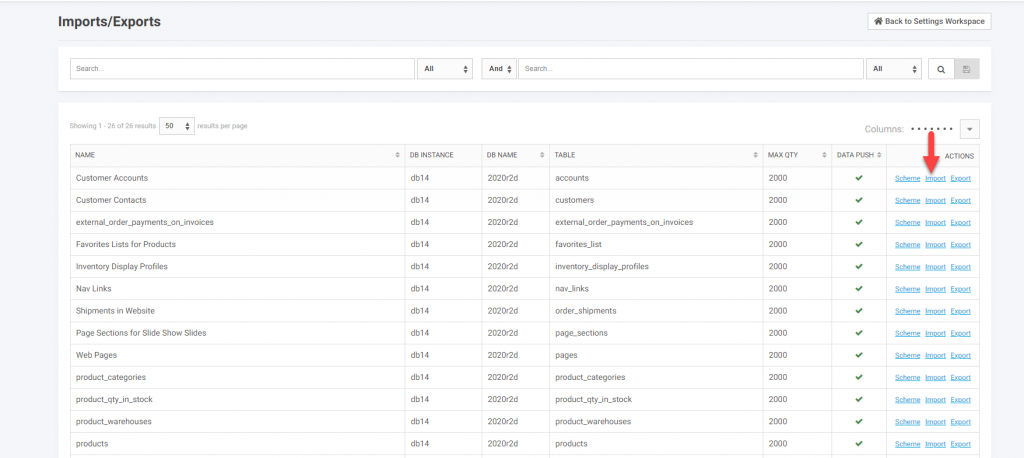
Once Selected you will see a list of the available tables to do imports. Notice this also shows the maximum number of records per upload in the Max Qty column. You will want to select Import next to the desired table.
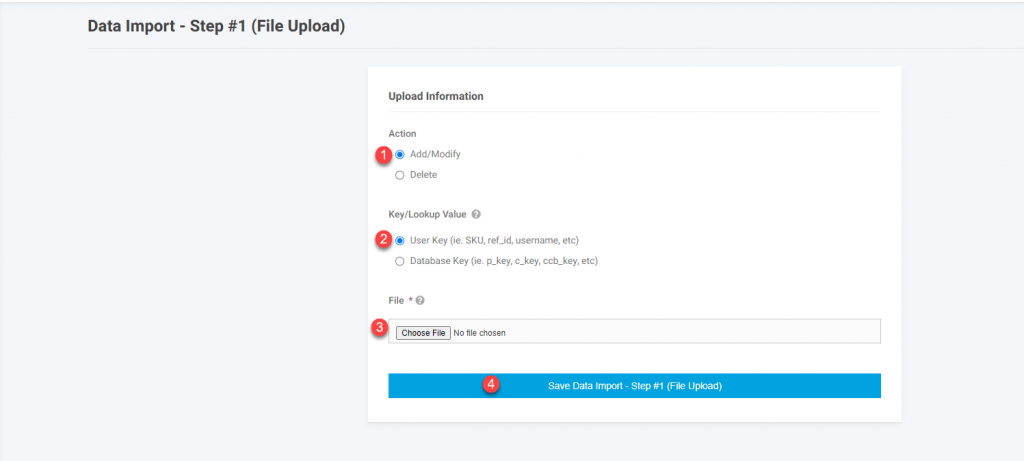
On the next screen you will want to verify actions. The defaults are typically what are used.
- Select the Action. This is almost always Add/Modify. As noted above the Delete option will delete the entire record and not just the fields on the spreadsheet. If the record is mapped to other records then deleting may cause orphaned records. If you must delete a record it is typically safer to that through the individual record U/I and not using this uploads function.
- Choose Key/Look-up Value. As noted above, the suggested is to use the default – User Key. This is typically going to be the value you are familiar with.
- Choose File. This is the CSV file created above. This is selected from you computer you are doing this operation from.
- Save Data Import – This does not start the upload. There is another verification step. Nothing will happen until the next step is submitted.
Importing Step 2
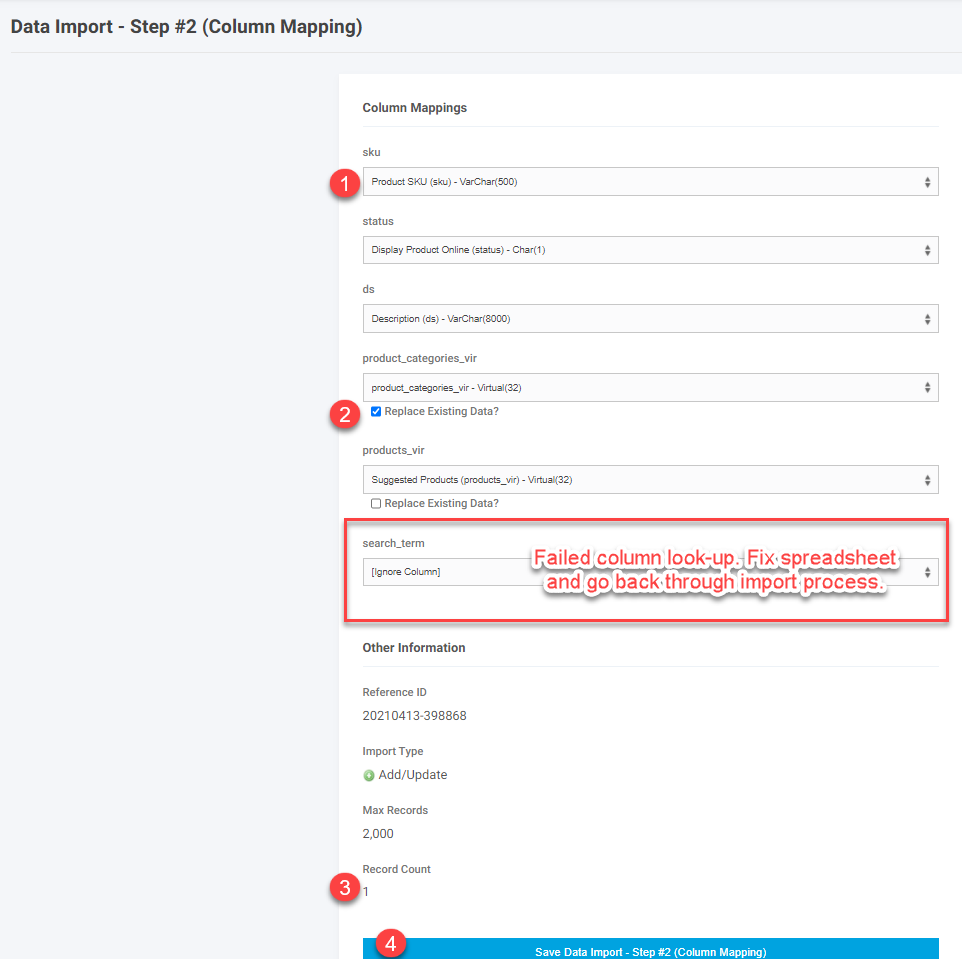
On the next screen you will see the columns from you spreadsheet and if they successfully mapped. You should check the following
- Verify all the columns successfully mapped. If any of the fields displayed say “[Ignore Column]” then the field does not exist for the particular import. The field name needs to be corrected on the spreadsheet and the import process restarted. The droplist can help you identify the correct column name, but selecting the column in the droplist after it reported “[Ignore Column]”will not have the import use this selection in the import and the import will fail.
- If using any virtual fields and you want to replace all the existing mapping for this record with just the ones on the sheet then select the checkbox next to “Replace Existing Data?”. The default is this is not checked and the data will just be added. For example if you are mapping products to categories and you have decided to re-do all of the category mappings for the particular product and just want the product mapped to the categories on the spreadsheet then choose the replace option. If you have created a new category and want to just add the one category to the product and leave all existing then just put the new category id in the virtual field and do not select the replace option. All record on a given spreadsheet for the virtual field have to be treated the same. If you need some records to replace and others not, then those need to be done as two separate imports.
- Validate the record count. First make sure that the number of records does not exceed the max records. If it exceeds the max number it will only import up to the max. Also make sure the count is what you expect. Some times after manipulating a spreadsheet there can be extra rows that you forgot about. This is just a good sanity check before submitting.
- Click on “Save Import Data – Step #2”. This actually starts the upload process. Once submitted the process cannot be stopped.
Importing Step 3
After Saving/Submitting in the previous step the import is queued for processing and you will get a processing screen as noted in this screenshot. This may take several minutes for the import to get picked up and processed.

After the processing is complete you will get a report back on the processing. You want to review this to make sure what you were expecting happened and if there are any errors. For example if you were expecting to update records on an import and it reports back that records were added you will need to review and get rid of any records that may have been created in error due to an incorrect user key. The report back will have:
- Records Added. This is the records added to the database with the user key specified. If this does not match exceptions then you will need to investigate.
- Records Updated. This is a count of the records updated. If this does not match exceptions then you will need to investigate.
- Records Removed. This should only show values where you ran this as a delete. This would be the count of database records removed.
- Records Errored. This will give you a count of any records that may have errors. Details on the error(s) will be reported in below.
- Records Skipped. This will let you know any records skipped (not updated/added). Detailed information would be reported in the section below.
- Import Time. This is the time the actual record add/update took. You may have waited longer for the file to process as most of the time in this step is waiting for the file to be picked up to be processed.
- Error Information. This gives you detailed information on any errors. An error does not necessarily mean the record did not process. The record may have processed but as in the example once of the virtual field values was not found. The other direct updates processed this mapping record was just not created.
- Shortcut Buttons. These buttons can just take you to Upload to the Same Table where it takes you to the Dat Imports Step 1 screen where you can just pick another file to upload if you are wanting to upload to the same table. The Manage Uploads button takes you to the list of tables where you can pick an import to another table.

Importing Review
At this point you will want to review some of the records from you import to make sure the update did what you expected and you would also want to review any erred or skipped records.
Exporting/Downloading Table Specific Data
Data exports allow you to download specific fields from a CIMcloud database table to be able to review and manipulate data. Downloads come from a specific table but can have virtual fields set up to display a list of mapped values as well. The main tables have at least one standard export available. You are able to add fields to existing exports, create new exports, and create filters on exports. There are times when there are system fields shown in the field list that may cause issues so remember the fields you add as you may need to remove them if they cause issues. Any updates or additions you make to the site will be for all Workers on your site and are not user specific.
Downloading an Existing Export
Like imports you can access exports either from the Imports/Exports page or in release 2020.R2.2 and later from some of the particular records in the worker portal.
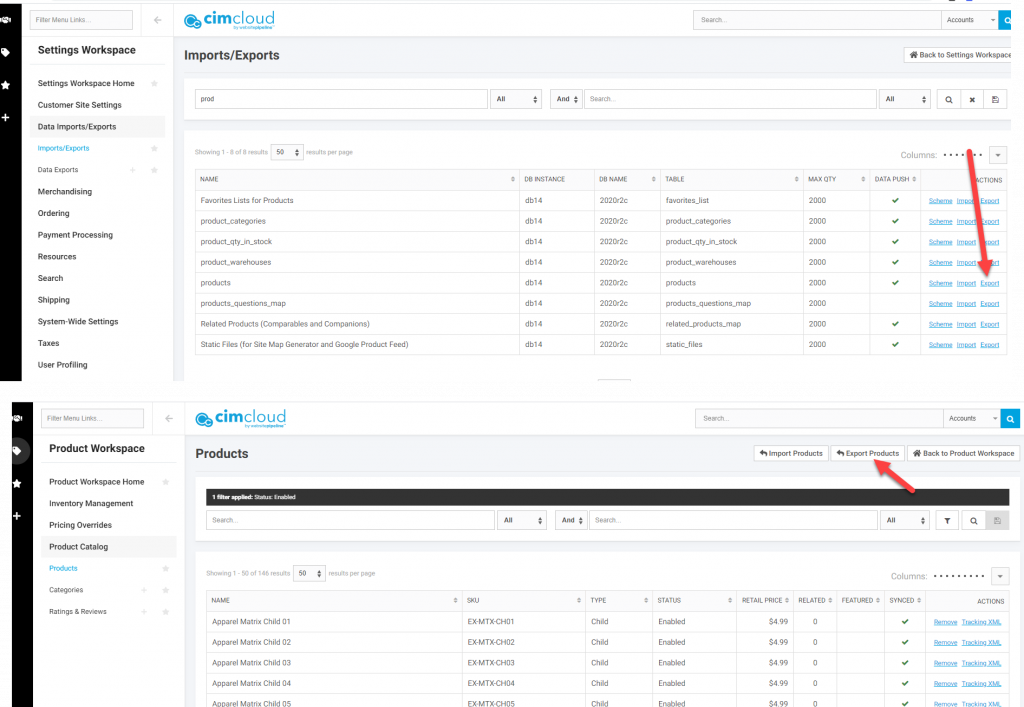
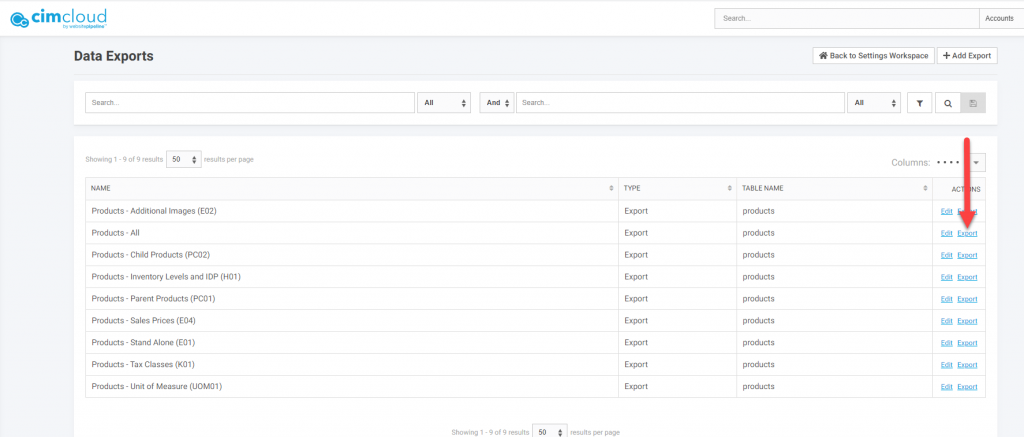
Depending on the export there may be several existing exports to choose from. Determine the export you want to run and click on Export.
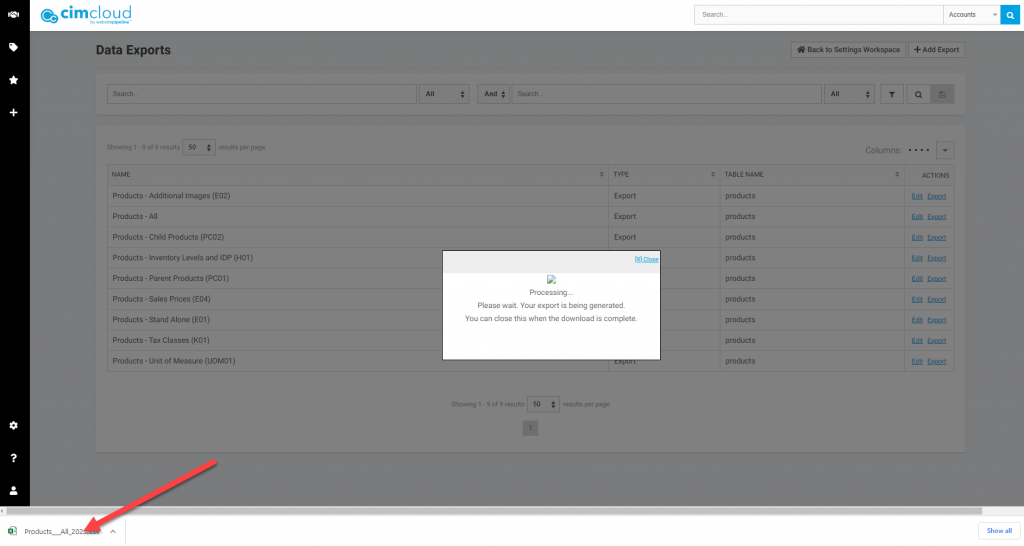
You will see a processing pop-up and the file will start downloading to your computer. You will see the file at the bottom left of the window. It will also be available in your downloads folder when complete. Note: The processing window stays open even after the download is complete. You can monitor the progress by looking at the download at the bottom left of the screen. You can close the pop-up window after the download is complete.
After the down is complete you can open the downloaded file.
Note the first column will always be the system record key value. This is typically the value you don’t want to use so it is best as a first step to go ahead and delete this column. So in this example delete p_key. The value SKU is the user key and value you want to use to indicate the record to be updated or added for products. The first row contains the database field names. If the export contains a virtual field it will contain a semicolon delimited list of the mapped values.

Editing an Existing Export
If you click on Edit next to a specific export you can modify that export. You can add/edit filters and add/remove columns from the export. These changes are global for all users in your worker portal and are not user specific. The top of the form has the general information on the export like its name and also has the specific table the export is for. Typically when editing you are going to leave these values as is.
Below this are the sections for the filters and the available fields/columns.
Export Filters
For filters you will see two options, Simple and Advanced. Advanced uses a CIMCloud specific nomenclature and will not be covered in this article. You will want to use the Simple option.
If a filter exists you can edit it or if you want to add a new filter click on the Add Filter option
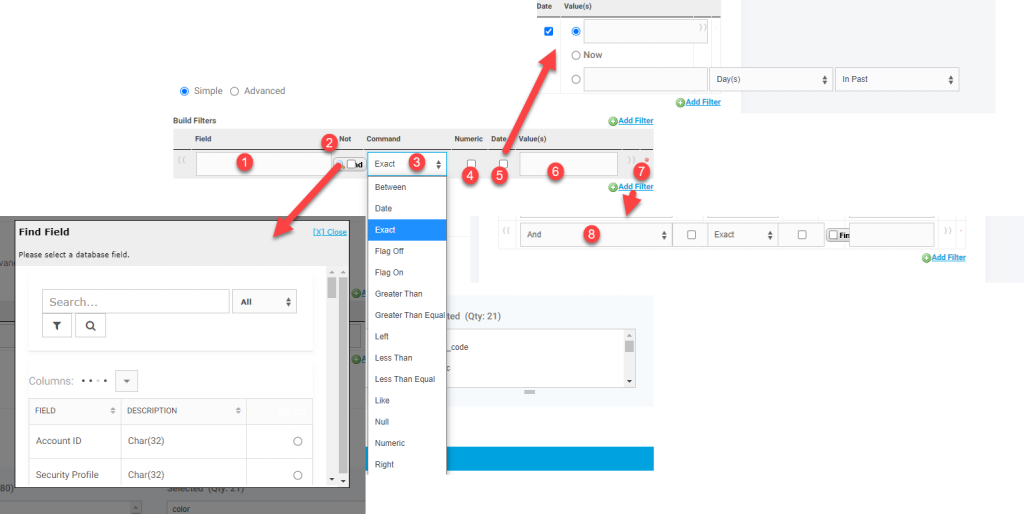
- Field. First you want to set the field you want to use to filter the data. This cannot be a virtual field and must be a field directly on the table. You can use the find feature to select the field.
- Not. Check this box if you want the results returned to add a “Not” to the the next Command. So if you wanted to add a filter for product status and wanted only active products you could do a filter where Field = Status, Command = Exact and Value =1 or Field = Status, Not was checked, Command = Exact, and Value = 0. The first would give you all the records where the status = 1 and the second would give you all the records where status was not equal to 0.
- Command. This is the operator for the value. the typical ones to use are Exact (Equal), Like (contains), Greater Than, Less Than, Left (starts with), Right (ends with)
- Numeric. This converts the data in the defined Field to numeric for the operation. If the field is already defined as numeric in the database it will be treated as numeric. This would only be used if the field is not a numeric field and you wanted the operation to treat it as numeric. This only works if all the data can be converted to numeric so is rarely used. If all your SKUs are numbers and you wanted to get all SKUs greater than 20 and you did not choose numeric, then the return would contain 3.45 since as a string 3 comes after 2. If you did choose numeric then 3.45 would not return since as a number 3.45 is less than 20.
- Date. This treats the field as a date and gives extra operators for NOW (today) and X days in the past where you define X.
- Value(s). This is the value you are comparing against
- Remove. This removes the entire filter
- Additional Filter (And/Or). If you add a second filter this determines if both filters need to be met (AND) or if either filter has to be met (OR).
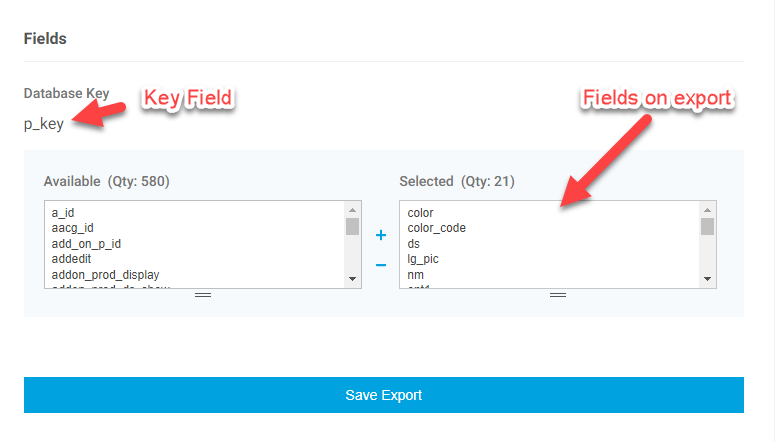
Export Fields
The export will have a list of fields in two areas – Available and Selected. The fields in the Selected list are the ones that display on the export. You can add or remove fields by either double clicking the field or selecting it and using the +/- to add or remove. In the header is the key field that will always be included in the export. It should be noted that some fields in the Available list may be system fields that will not display and can break the export. It is recommended that you only add the fields you need and keep track of the fields added in case they need to be removed.
Save Export
After changes are made click Save Export. The export changes are now available the next time the export is run. These changes are for all users and are not user specific.
Adding a New Export
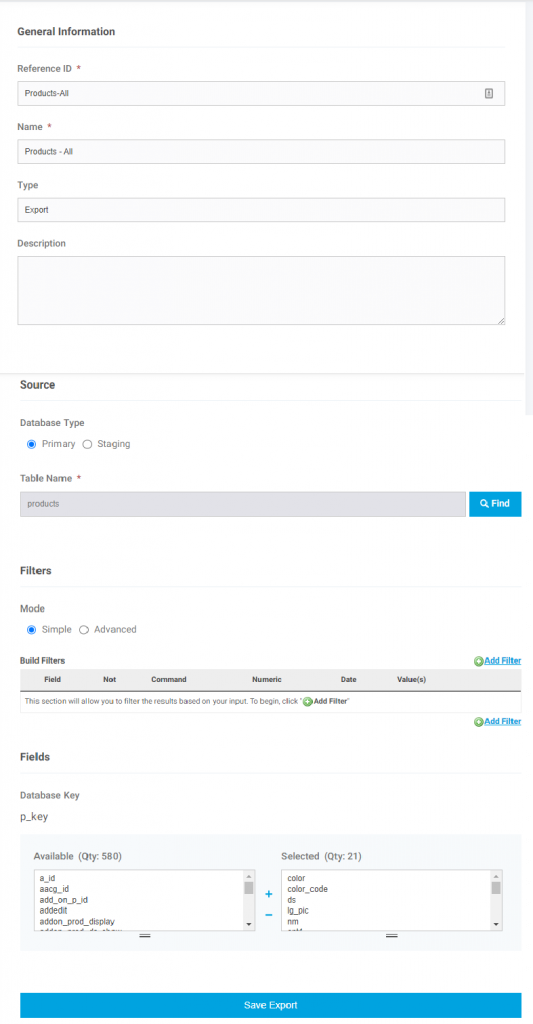
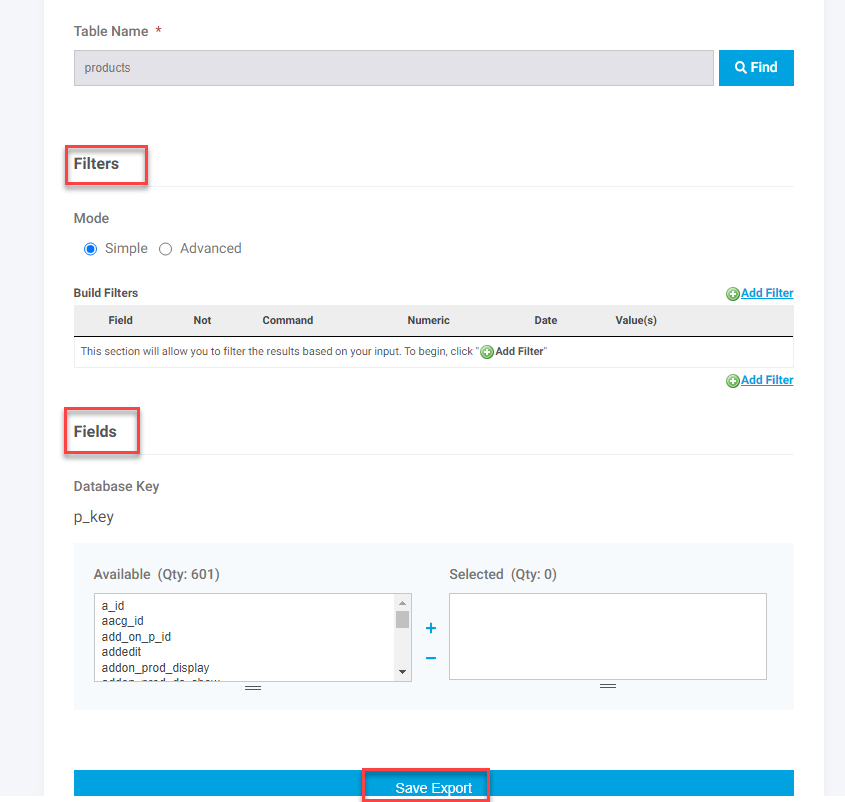
Adding a new export is similar to editing an export with the addition of a few more fields. You can add a new export by clicking the Add Export link at the top of the exports page

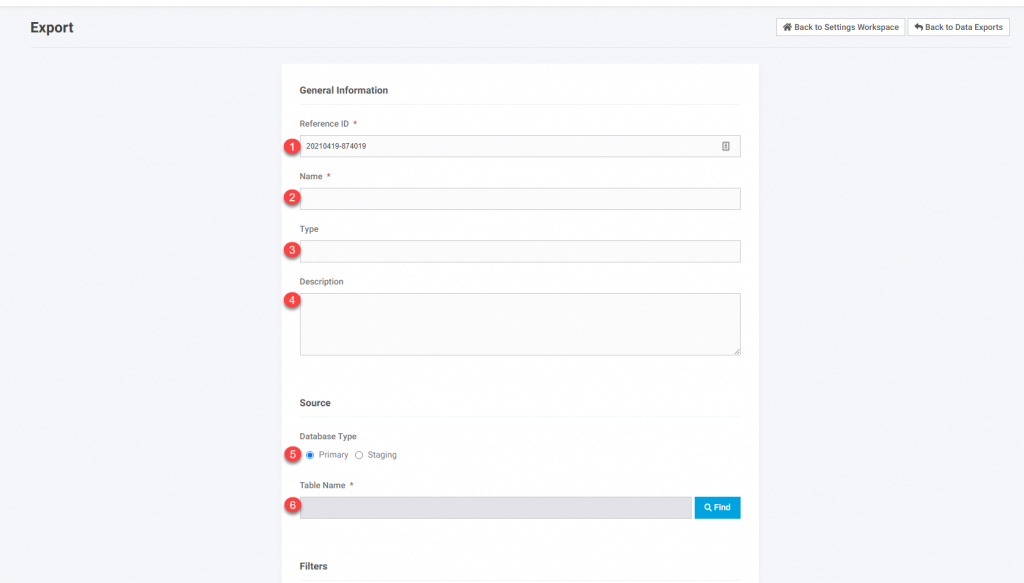
Add the following export specific information
- Reference ID – This is the unique identifier for the export. It can be anything unique but should not contain any spaces. This will default to a system generated string that contains the date. You can keep this or make changes.
- Name. This is the name that displays and should be named to be able to understand what the export is specifically for.
- Type. This is not required but typically just type in “Export”.
- Description. This is not required but can be populated with any additional information you may want displayed.
- Database Type – Leave this as the default of “Primary”.
- Table Name. Look up the appropriate table name. You will see this on the Import screen or other existing exports.
After the header information is completed and a table is selected all the available fields for the table should populate. You do not have to save the record for them to populate. They will populate shortly after the table is selected. Once they have populated set up the desired filters and add the fields you want on the export as noted above in the Editing an Export section. When everything is done you need to Save Export. Once the new export is saved it should show on the available exports list for the particular table.
Sample Uploads
Contact (Customers) Example Import
Product Category Example Import
Stand Alone Product Example Import
Document Downloads Example Import
Product Additional Images Example Import
Product Static Page Example Import