Overview
As of core release 2025.2.0 (4.13.0) the core product includes Report Builder. Report Builder is a tool that allows workers, with access, to create reports that can run across multiple tables on the site’s CIMcloud database. These reports can be used to create an Excel export or can be used to create new report pages that can be published to the worker portal and/or customer site(s). Over time this tool will be expanded and improved upon.
Reports are in a basic column and row layout and cannot be used for a product catalog display type layout. Creating reports requires some rudimentary knowledge of SQL queries and the CIMcloud table structure.
Here are things that as of the current version of Report Builder are supported and not supported.
Supported
- Creating links to reports to be able to publish as pages on the worker portal or customer site(s) with the limitations as noted in this article.
- Basic search of the data on the report page.
- Sub Selects to return column data (these can be used to return data but these fields or not searchable)
- Worker AQT(Accounts Query Type) – If a worker has access to only specific Accounts and Accounts are included as a linked table in the report, then the worker will only see data for the Accounts they have access to.
- Sitefront AQT – If a report is published to the sitefront (customer site) for logged in users and the accounts table is included as part of the query, then the user will only see data for the accounts they have access to to. This is typically just their account unless the user is set up for Power Customers.
- Datasets for Products – When viewing the sitefront report results, any product data sets will be applied to the report
Not currently supported
- Renaming columns on results page
- Formatting data-types (e.g. converting price field to display as a price)
- You can manipulate a string in Advanced Fields to display a price field as a price
- Returning a customer’s specific price for a product
- Converting reports into Static pages
- Datasets for Product Categories
- Sorting is not supported on sub-selects in advanced field.
- Virtual Fields – Any fields that end with “_vir” included in Simple or Advanced fields will cause the Results page to error
What an Admin Worker Sees
Any user with system settings access will be able to create reports. No additional features need to be installed on the site.
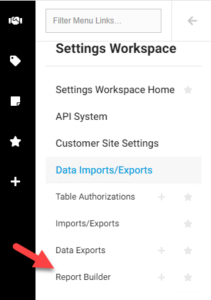
To see existing Report Builder or create new reports navigate in the CIMcloud worker portal to Settings Workspace > Data Imports/Exports > Report Builder
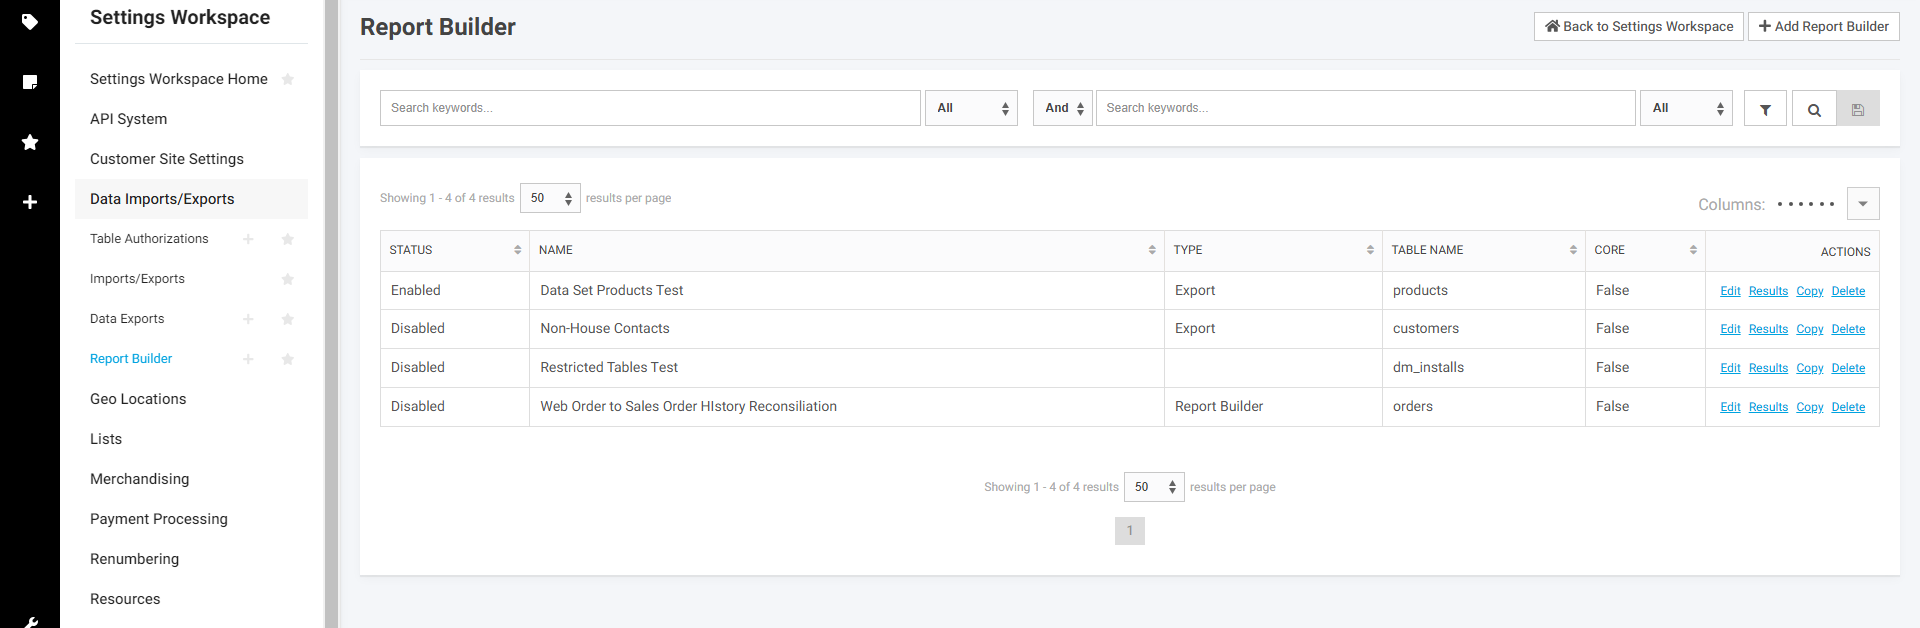
For existing reports in the Actions column to the far right you have the following actions
- Edit – This allows you to edit the existing report
- Results – This shows you the report results in a table format that can be searched.
- Copy – Allows you to copy an existing report to create a new version without starting from scratch.
- Delete – Permanently deletes the report. If this is used as a report page in the worker portal or sitefront these report pages will not function if this report is deleted.
Creating a New Report
To create a new report click on the + next to the Report Builder menu option or + Add New Report Build at the top right of the Report Builder page. The following explains the use of each field
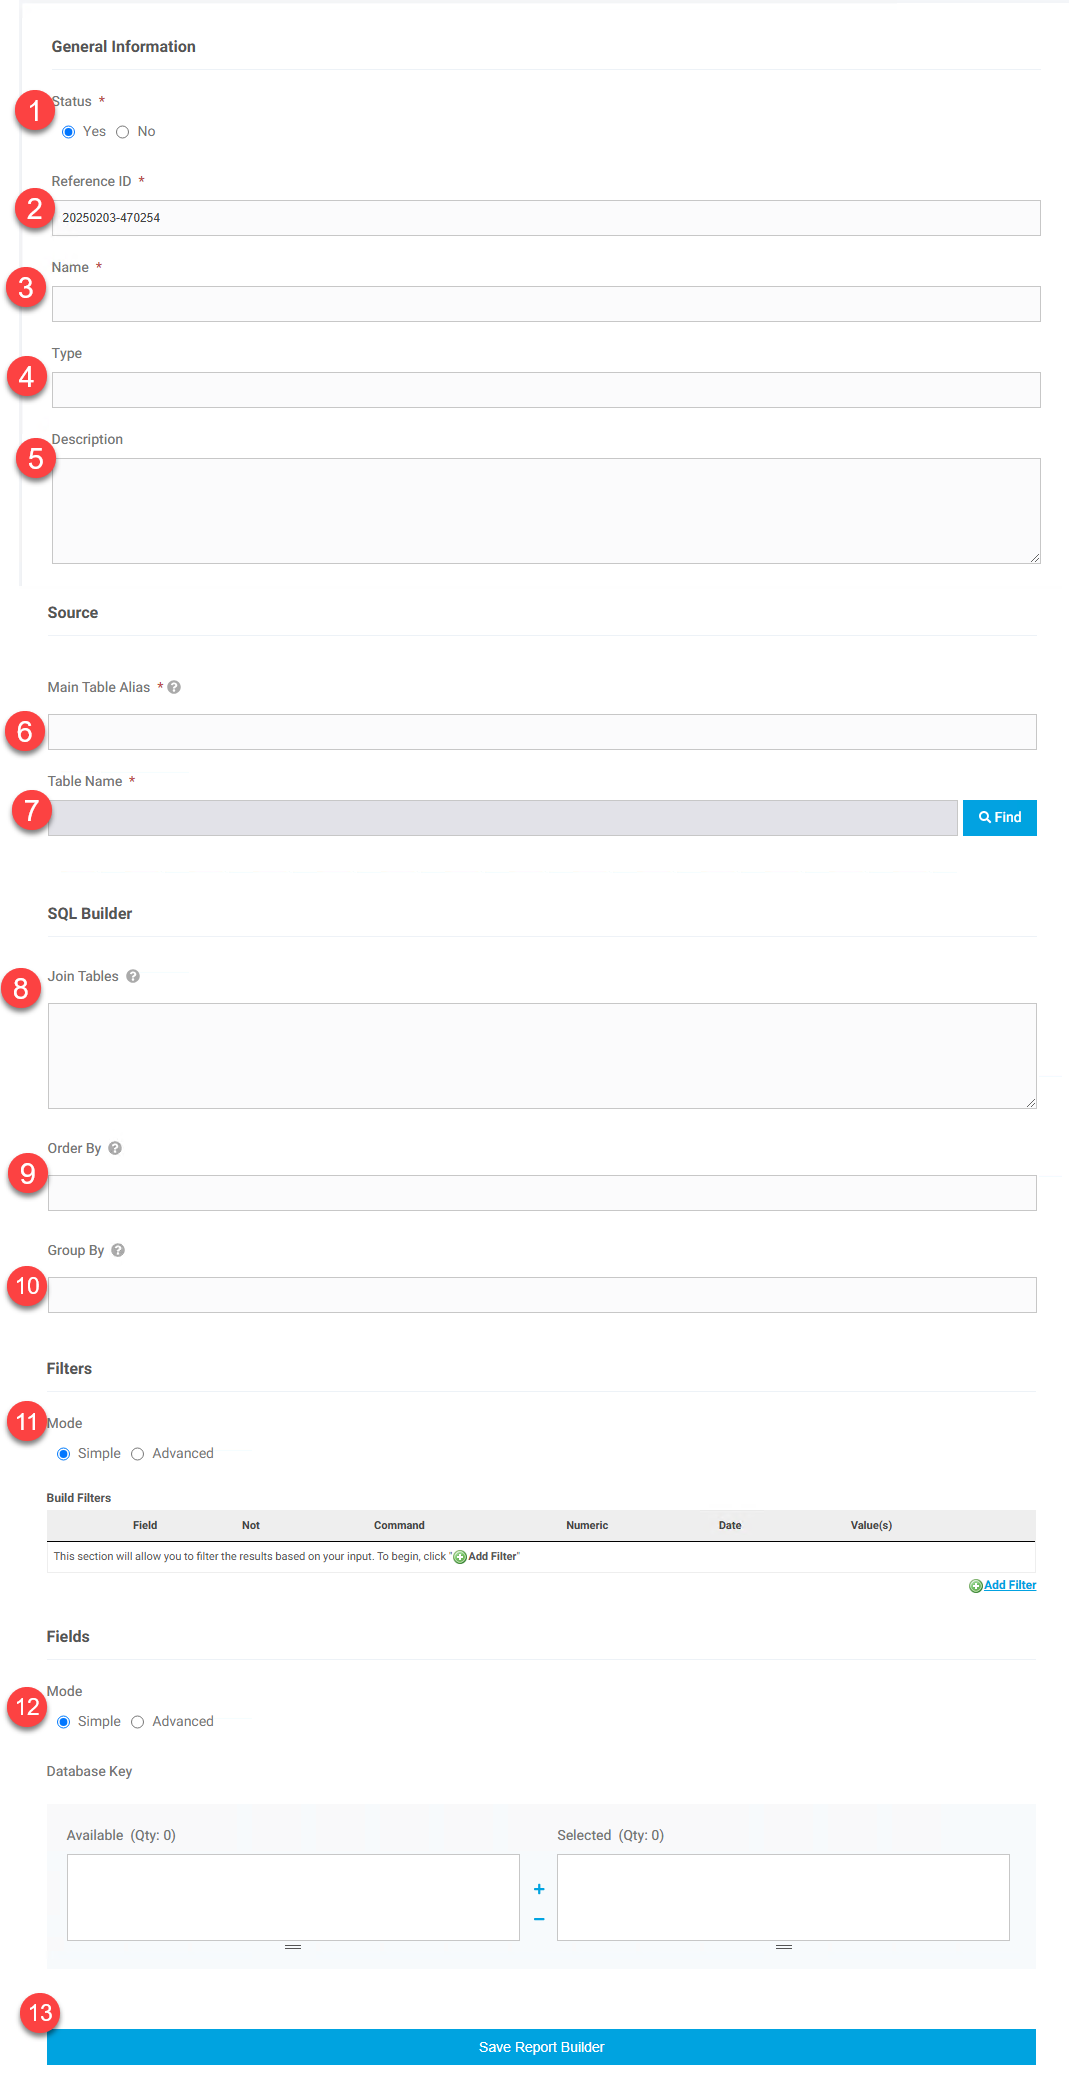
-
- Status – status of the report (Yes = Enabled, No = Disabled). Disabled reports will not display results to users
- Reference ID – This is the unique identifier for the record. You can accept the default or set a unique value. Do not use any special characters or spaces in the this field beyond dashes or underscores. This does not display anywhere to users using the report.
- Name – This is the public name of the report
- Type – This is a way to categorize the report if desired and is not required
- Description – This is for your internal use and can be used to give details about the report. This is not required
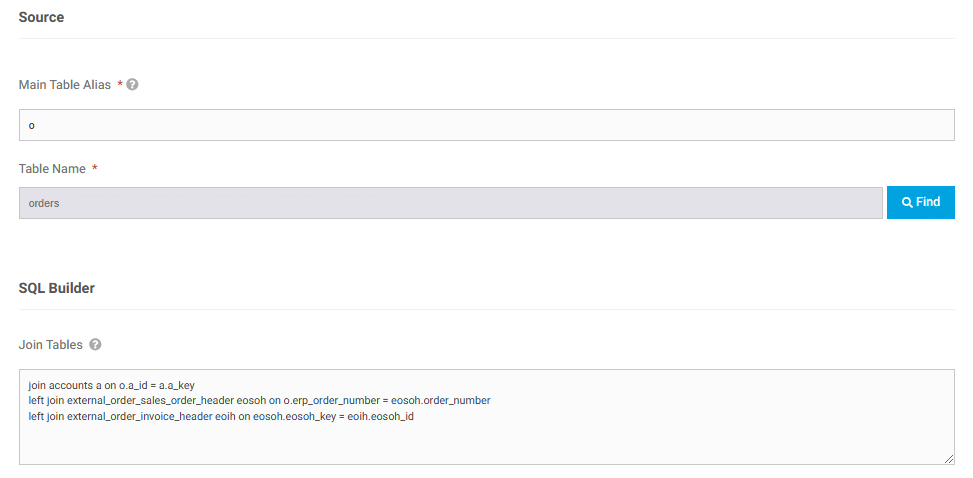
- Main Table Alias – This is the alias used for the main table your report is pulling from and uses the standard SQL table alias concept and is required. This is a way to create shortened references for the main table and is required. So if you are basing a report off the CIMcloud sales order history table, external_order_sales_order_header, you could alias as eosoh so you do not have to write out the full table name all the time.
- Table Name – Used the Find selector to pick the main table for your report. This is required.
- Join Tables – This is used for any tables you want to join to the Main Table selected. This uses the standard SQL join concept and format. Do not repeat the main table in this section and this section should start with the join type and first table you are joining to the main table. Here is an example of a report starting with the web orders table (orders) and joining to the account for the order and sales order history.
- Order By – The field to order the report data by. Include the alias table as part of the value and include the direction (asc or desc). This uses standard sql conventions
- Group By – This is the fields to group the report by. This uses standard SQL conventions and must be fields returned in the report.
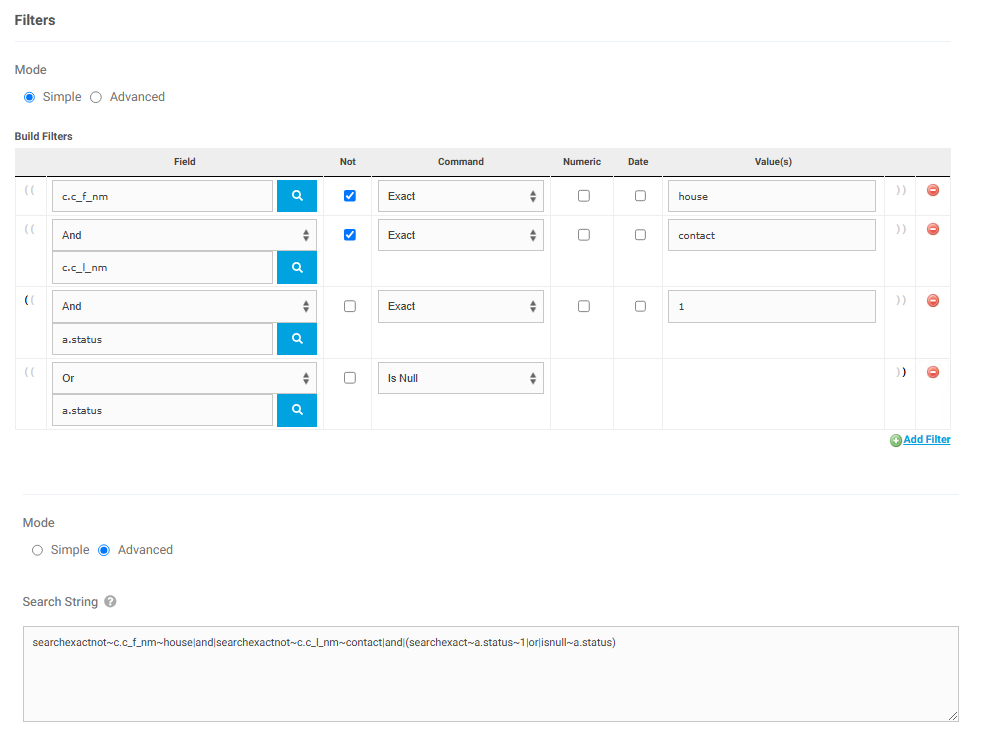
- Filters – This builds the SQL Where clause for the report or what the report filters on. The simple mode allows for you to build the filters using the interface. Advanced allows you to just type in the filter using CIMcloud searchstring format. This article has information on this format – GET Requests – Searchstrings . The following shows the same filter set-up using both Simple and Advanced. Currently the field look-up only supports looking up values for the Main Table, but field values for any of the tables in the report can be used and just typed into the Field area. Make sure to include the table alias from the query. There are options to add add parenthesis to group parts of the filter. Note there are options for Not which would be to select records where the value does not equal. So Not and a Command of Exact would pull values where the field is not equal to. Not and Is Null would pull where value is not null.
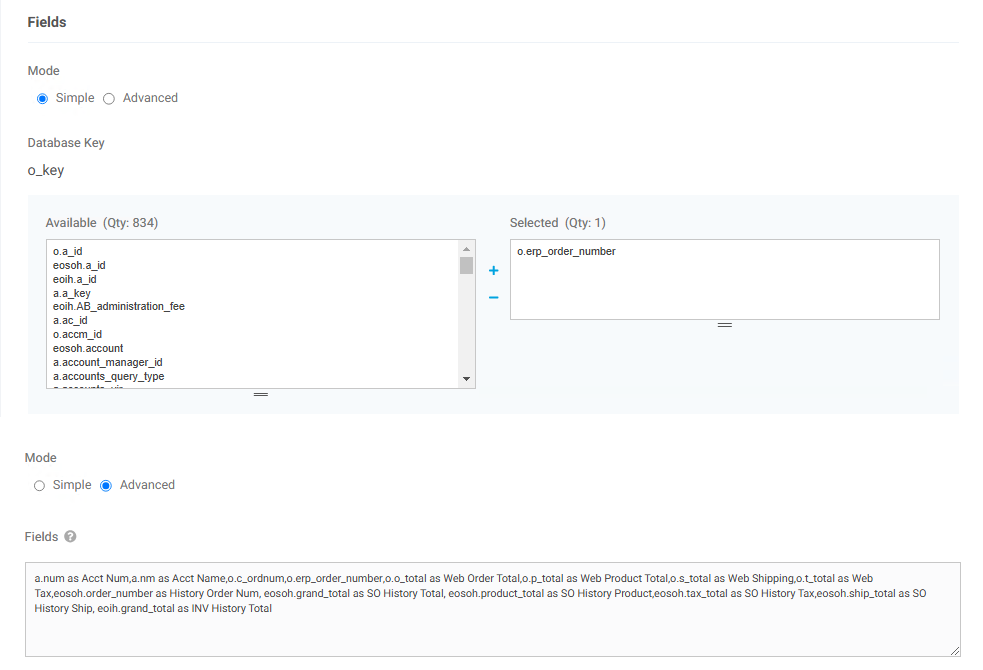
- Fields – This is where you can select the fields for your report. Again there are options for Simple and Advanced. Advanced uses standard SQL formatting for a Select statement including doing sub selects. Simple allows you to pick fields to show on the report and will show with the field name as the column header on the report. It is recommended to use the Advanced option so you can alias the fields for the column header of your report. The Simple options does show fields for all the tables in the query so can be used to help identify field names. These two function independently and applying a field in Simple mode does not make it show in Advanced mode. If using Advanced mode do not use a carriage return and just let the display wrap on its own. Hitting Enter will cause the report to error.
- Save Report Builder – Click this to save the report. After saving click on the Review option next to the report on the manage page to see the results and verify there are no issues with the report.
Creating a Report Builder Page
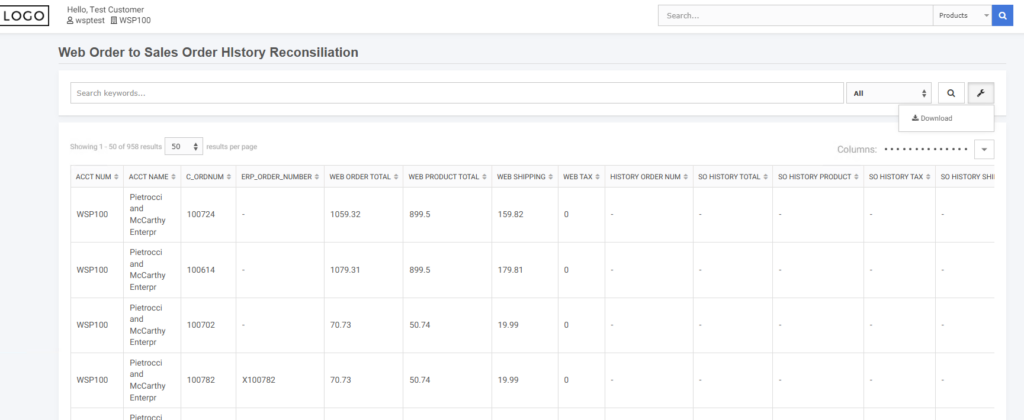
After creating a report, the report can be turned into a page accessible to workers and/or sitefront users using the URL of the Imports/Exports > Report Builder > (the report you want to share) > Results page. You can use the URL in conjunction with the general Navigation and Menus functionality to add links to this report.
The report by default has simple search capability and a download link. The columns will display with the alias value given and in the order listed from the Report Builder setup. Aliased names can contain spaces.
What a CRM Worker Sees
There is no additional functionality for CRM workers. Any report created for the worker portal will only include data for the accounts the worker is set up to see as long as the accounts table is included in the query for the report.
What a Customer Site User Sees
A report add to the menu for a customer site will only show data for the users account as longs as the accounts table is included as part of the query. Additionally if Data Rights for products and/or product categories are turned on for the user then they will only see product products available through their data rights setup.
If Power Customers is in scope then the user will see data for all the accounts they have access to.
Tips and Tricks
Use search engines if you have questions on using SQL. There are tons of free resources to help with learning basic SQL syntax.
Use the main table look-up to see if you can find the table you need. Do a simple report for just that table to see the fields and what data may exist in the table to see if it looks like what you are looking for. Here are the most commonly used table
- Accounts
- Customers (these are the contact and worker records)
- shipping_addresses
- products
- product_categories
- product_category_map (this is the mapping between products and product categories)
- external_order_sales_order_header (ERP synced sales order headers)
- external_order_sales_order_detail (ERP synced sales order details)
- External_order_invoice_header (ERP synced invoice headers)
- External_order_invoice_detail (ERP synced invoice details)
- external_order_shipments (ERP synced shipments)
- orders (web order headers)
Most tables are joined by a key field in the main table and an id field in the linked table. For example all contacts are tied to an account. The contacts exist in the customers table. The key field in the accounts table is a_key and the associated field in the customers table is a_id. Similarly a sales order history header record is in table external_order_sales_order_header and has detailed records in table external_order_sales_order_detail. These are joined by the eosoh_key field in external_order_sales_order_header joined to eosoh_id in table external_order_sales_order_detail.