Overview
The CIMcloud B2B-first ecommerce platform includes a robust, native “out of the box” bi-directional integration with Acumatica ERP.
This article reviews the requirements and steps to connect the CIMcloud platform to Acumatica. This is part of the “Getting Connected” step (for Acumatica customers) referenced in this article walking through our overall process: Implementation Process (from Sale to Go-Live).
Steps – Summary
The following is a summary of the steps involved in connecting a CIMcloud platform to Acumatica. Detail on these steps are below.
- CIMcloud builds / deploys the CIMcloud Platform
- Client completes ERP Questionnaire (scroll all the way down to download it)
- Client creates an Acumatica user for CIMcloud
- CIMcloud installs CIMcloud Generic Inquiries in Acumatica (optional: Client or ERP Partner can install them)
- CIMcloud sets up Connected Application in Acumatica
- CIMcloud syncs initial data seed to CIMcloud platform and verifies continued syncing is enabled / working.
- CIMcloud tests syncing of data into Acumatica (orders, customers, addresses, invoices payments, etc)
- CIMcloud turns the connected CIMcloud platform over to client to review and start the Implementation stage of the project
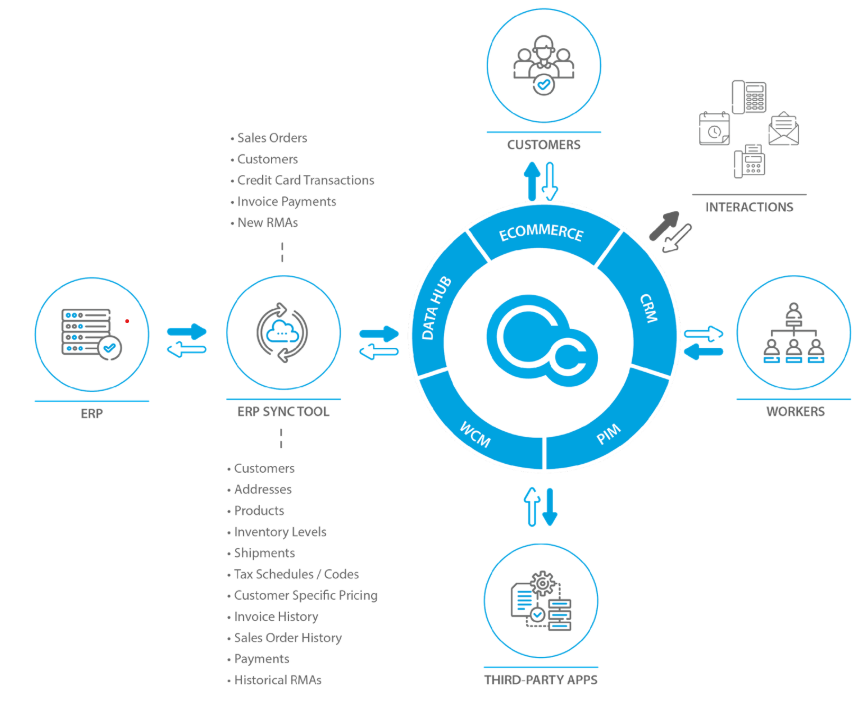
Background: Diagram of the CIMcloud w/ ERP Sync
This diagram is provided for reference. In this diagram, the “ERP” is Acumatica and the “ERP Sync Tool” is part of the CIMcloud standard offering (it is run, hosted, managed, monitored, and maintained by CIMcloud as part of our standard monthly fee). The ERP Sync Tool interfaces with Acumatica through Acumatica’s standard integration framework (using the API and OData layer + Generic Inquiries).
Steps – Details
Initial Platform Deployment / Build [CIMcloud]
Whether this is a new CIMcloud customer or an existing customer moving to Acumatica the typical first step is for CIMcloud to build out a new CIMcloud platform to be integrated with Acumatica. This is built based on the scope from the sales process.
Complete ERP Questionnaire [Client]
The ERP Questionnaire for Acumatica is attached at the end of this article. This should be completed and returned to CIMcloud as soon as possible. This provides the information needed for CIMcloud to successfully integrate the CIMcloud platform to Acumatica. Answer the questions as as best as you can. If unsure please ask questions or answer as best you can. If a section does not apply to you , you can just skip those. For example you can skip the Retail Catalog section if you are just a B2B portal, but if you will have a public facing catalog and cart you will want to complete this section. This should be returned to your CIMcloud Customer Success Manager.
Create an Acumatica User for CIMcloud [Client]
CIMcloud needs a user to be able to set up the connected application as well as provide ongoing assistance for CIMcloud Generic Inquiry updates. Additionally this is the user the API will use to import transactions into Acumatica. Most users choose to provide admin access for the user to minimize issues but lesser permissions can be applied. Minimally the users needs access to:
- Create and manage Generic Inquires
- Create the Connected Application
- Create Sales Orders
- Create Invoice Payments
CIMcloud will store these credentials encrypted (for API connection) and in a password manager. Access to the credentials in the passwords manager are provided to users only on an as needed basis. CIMcloud will typically change any initial passwords provided after verifying connection.
These credentials should be set to not expire passwords to prevent future interruptions.
Install Generic Inquiries [CIMcloud]
The initial install of the CIMcloud Generic Inquiries ( Specifics on information pulled from these queries can be found here – Acumatica Data Sync Overview ) can be done in several ways and can be done either by CIMcloud or the client. It can be done as a project in Acumatica or individual xml files.
Installing Generic Inquires using an Acumatica project:
Advantages
- Fast – This installs all the generic inquires at once
- Installs across all tenants on the instance. The project will install on all tenants, so if there are live and test tenants, the GIs will be available on all.
Disadvantages
- When a project is published it logs out all users. The publish will need to be coordinated to not interrupt ongoing Acumatica operations or testing.
Installing Generic Inquiries using individual xml files
Advantages
- No interruptions
- Can be done on an individual tenant if concerns about installing across tenants.
Disadvantages
- Slower since done one at a time.
- Sometimes Generic Inquiry ID must be updated on the import if existing GI exists with the same ID number.
- The Generic Inquiries will not be available on other tenants with additional install steps
Create a Connected Application [CIMcloud]
CIMcloud will create a connected application for our sync tool, connect the CIMcloud platform to Acumatica, and verify the sync. This will use the user provided as noted above.
Initial Data Load [CIMcloud]
As noted in the Acumatica Data Sync article referenced above, the ongoing management of data syncing to the CIMcloud platform is managed based on incremental updates and the last data and time a particular record was updated in Acumatica as compared to the CIMcloud platform. This means CIMcloud only pulls the data that was updated since the last time the particular record set was checked. At this step of the install process we will pull over all the records for the particular record sets. We will pull over all products, customers, pricing, addresses,…. If this is an existing Acumatica instance the amount of history brought to the CIMcloud platform will be based on the the project scope ( the typical is 3 years). So if there is 10 years of sales history in Acumatica we would typically pull over all products, customers, pricing,.. with this initial seed and 3 years of sales order, invoice, shipment, and payment history.
Sync Test Orders, Payments, Etc Into Acumatica [CIMcloud]
In this step, CIMcloud will use a mutually agreed upon test customer to sync new transactions (sales orders, invoices payments, etc) from the CIMcloud platform into Acumatica.
Site Turnover [CIMcloud + Client]
Once the data sync is set up and the initial data load is complete the site will be turnover for next steps as noted in Implementation Process (from Sale to Go-Live)
Acumatica ERP Questionnaire File for Download:
Acumatica-CIMcloud-ERP-Sync-Tool-Configuration-Questionnaire-2024-3-24