Overview
This article reviews concepts and set-up instructions for shipping methods as part of the base platform. Additional features are available in several of the addon bundles – Optional Software Bundles Overview.
The base platform allows for the creation of shipping methods that users can select from and the selected method can be passed onto the order in the ERP system.
Options include:
- Setting up internal rate structures for a fixed amount or percentage based on product cost, weight, or count. This can include just setting a fixed shipping cost for a given method.
- Making an external call to your Fedex or UPS account to return rates based on a fixed ship from location, the shipping address on the order, and the weight of the product. For the external calls to UPS and Fedex to work the products must have a weight. More information on product weight can be found later in the article. These external calls are for parcel shipping only. Freight shipping external pricing calls requires the additional software bundle – Advanced Shipping Price Calculations [L]
- A call out to USPS can be added to the site but requires a small amount of additional set-up. If this is something you need on your site please enter an extranet support ticket to request pro-services assistance setting up USPS shipping.
- Different shipping methods can be set to display/not display based on:
- Order product weight total
- Order Price total
- Ship to location
- A shipping method can be set up to collect the customer’s shipper account information. This will be covered in a separate article – Shipper Accounts
- Shipping methods can be set to display a message instead of cost. This is typically something like TBD where you will add actual freight costs at time of invoicing.
- Add multipliers to external rates to increase or decrease the rate present to customers based on the value returned for the carrier.
Note: You will never be able to set up the website so that you will always get an exact match from UPS or FedEx on the actual costs they will charge. Packaging weight, how items are packaged together, rate changes, and other factors will likely cause difference in the cost calculated. You can expect the cost calculated to be close, but there are likely to be some differences.
Prior to setting up shipping methods you will want to make sure you understand how you want to offer shipping on the site. Do you need to charge shipping on the site or can you just add it to the invoice after the item ships? Are you using shipping as a profit center? Is shipping built into the cost of the product? Do you need to offer expedited shipping methods? All of these should be considered before crating shipping methods on the site.
What A Customer Site User Sees
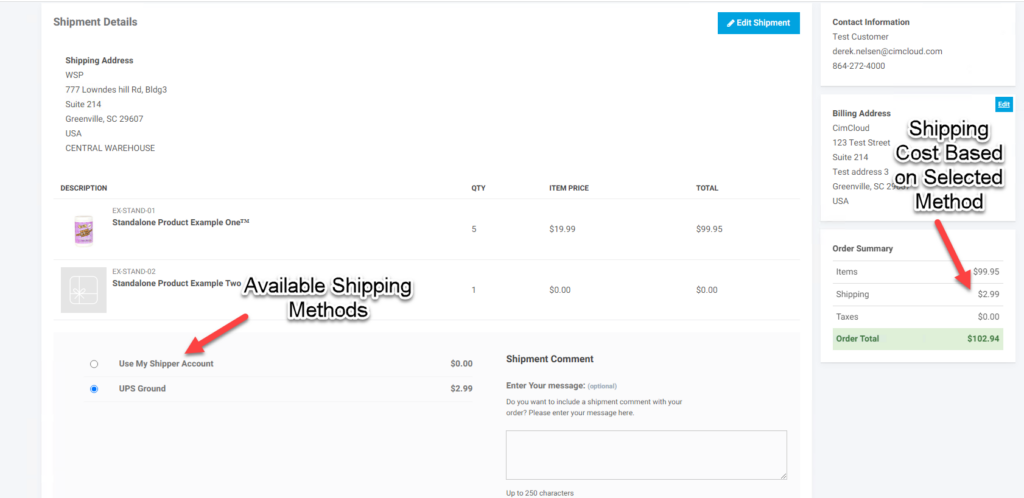
Users should be able to see shipping methods at checkout (Figure 1) along with the calculated shipping cost for each method. The cart total will reflect the cost of the selected shipping method. The shipping method display name can be a user friendly name and does not have to match the ship via set up in the ERP.
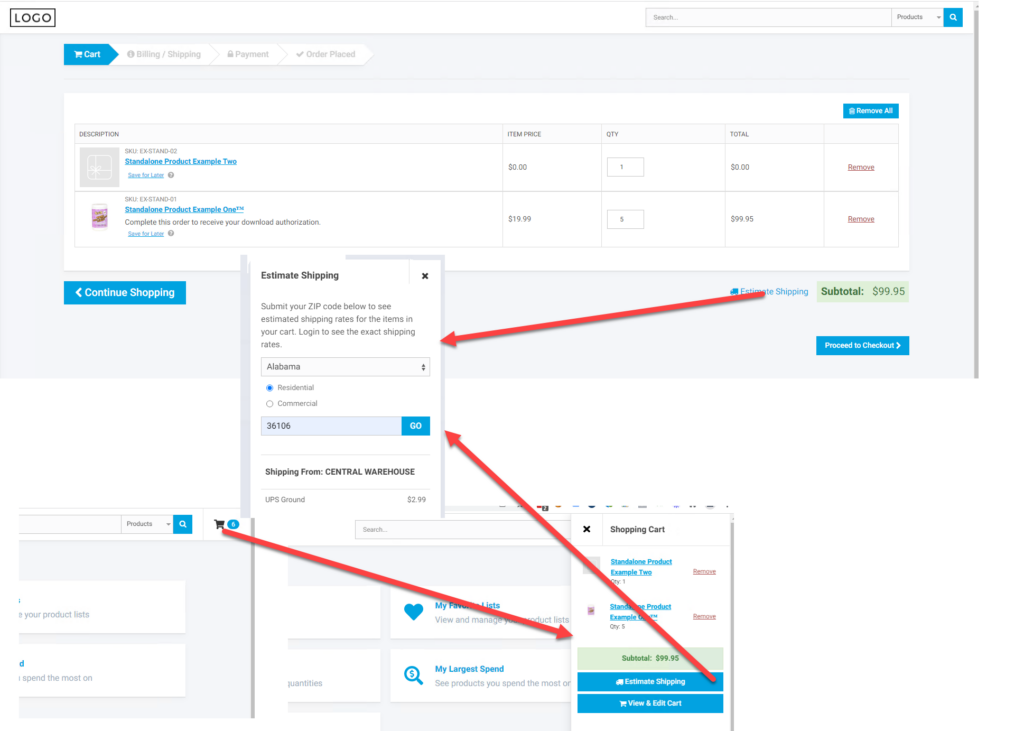
Users can also see the the shipping methods and cost in the shipping estimator (Figure 2) in the cart and cart pop-up if feature for this enabled.
Currently available configuration options will be reviewed in the Features section of this article.
What a CRM Worker Sees
A CRM worker will not see anything additional and will see what a user sees when impersonating.
What an Admin Worker Sees
Admin workers are the ones who will be setting up the shipping for the customer site(s). The basic set-up process would be:
- Set up any 3rd party integrations (UPS, FEDEX,…) with your account credentials and ship from information
- Set up the desired shipping methods
- Test to ensure desired shipping methods display and rates are what are expected.
Setting up 3rd party integrations.
Third party integrations are associated with the application as a whole and are not specific to a user or customer site. There are some additional software bundles that have features to associate different aspects of a 3rd party integration with a specific warehouse. See the additional software bundles for more information.
To set up the desired 3rd party credentials go to the Shipping tab in Application settings (Setting Workspace > System-Wide Settings > Application Settings)
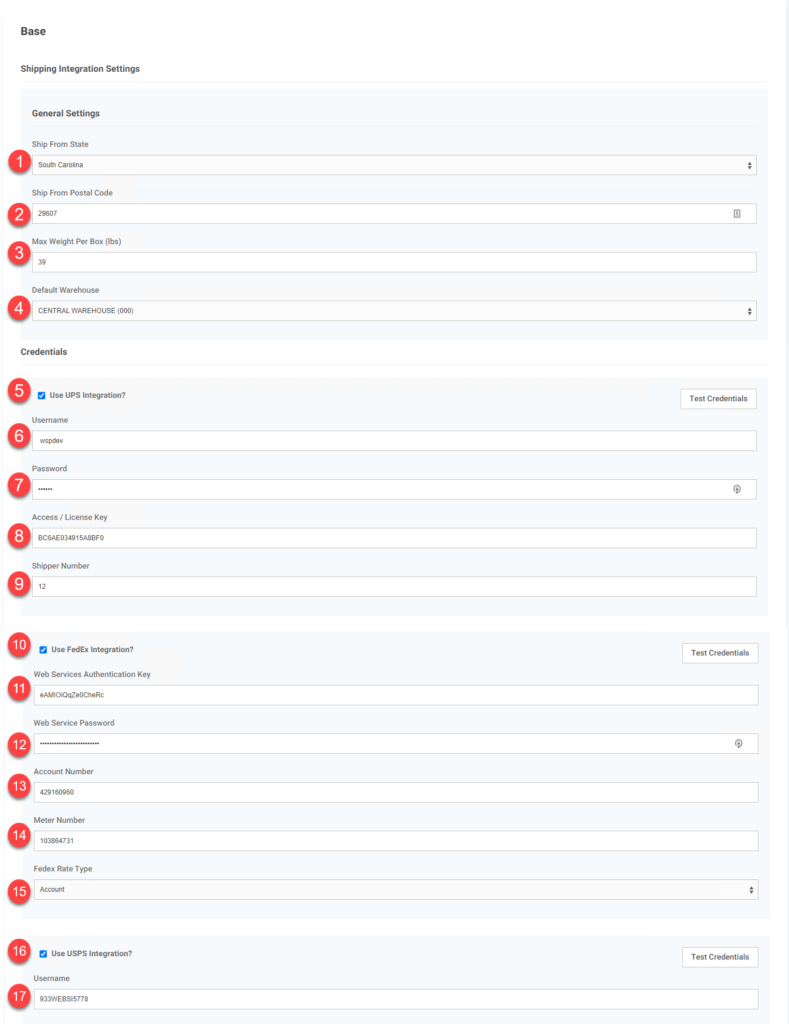
- Enter the Ship From State for the location where packages will be shipped from
- Enter the postal code (zip code) for the location where packages will be shipped from
- Ener the maximum weight per box. The system uses this to determine how many packages to break the order into. If an order has items that total 66 pounds and this is set to 40, the system will send this for rating as two packages of 33 pounds. If the order totals 39 pounds then it will be rated based on one package of 39 pounds. This is independent of how many items are on the order.
- Enter the default warehouse code for where items will be shipping from. The address on this warehouse should match the address information entered above.
- If you are going to use an external call to UPS to return rates from UPS click on this enable the fields to enter your UPS credentials. Your UPS credentials are needed to get rates based on your negotiations with UPS. Even if you just want list rates we ask that you set up and use a UPS account for your company to ensure that you continue to get the desired rates returned. The test credentials that are loaded are strictly that and may be changed or account settings change that could impact the rates returned. UPDATE: As of CIMcloud Version 2023.09 (internal version 4.7) the platform support UPS OAuth connection. This will be required for all sites by June 2024. For information on obtaining these new credentials from UPS and setting them up on the CIMcloud platform see – UPS Shipping API – Upcoming Changes
- Enter a Username associated with your UPS account. We recommend this not being associated with a specific individual as if their information changes it may impact the websites ability to pull UPS rates.
- Enter a password for the username above.
- Enter the Access/License key provided by UPS for your account. Enter the desired Shipper Number for the account you want the rates tied to.
- Enter the shipper number associated with the account for the desired rates. Appropriate values are:
- For Negotiated rates enter the Account Shipper Number
- For Retail Rates leave this field blank
- If you are wanting to return rates for order from FedEx then check this box to enable the fields to enter your FedEx credentials. As with UPS we ask that these be associated with and account you have established and you do not use the test credentials loaded with the site.
- NOTE: As of 08/22/2016, FedEx provides 3 levels of service: Standard, Advanced w/o Shipping Label, and Advanced with Shipping Labels. The customer should request Advanced w/o Shipping Labels to avoid receiving “FedEx Error 1000 – Authentication Failed”
- Enter the FedEx Web Services Authentication Key set up for your account
- Enter the Web Service Password set up for your account
- Enter FedEx Account Number associated with the account being used
- Enter the Meter Number for your Account
- Enter the desired type of rates returned.
- Account – Your Negotiated rates
- List – Standard rates that apply to non-account holders
- Preferred – This is a legacy setting and sets the rates the same as List
- This box is to enable returning rates for USPS. This feature is still a beta feature and is available but requires a small amount of additional set-up. If you are wanting to us this feature please enter a support ticket for CIMcoud to do the additional set-up.
- Enter the USPS username for your USPS account for CIMcloud to return rates.
- Note: You must register with USPS Webtools to return rates from USPS, register here
Setting Up Shipping Methods
The following sections reviews the fields available when setting up Shipping Methods.
General Information/Software Tracking Code/Price Calculation
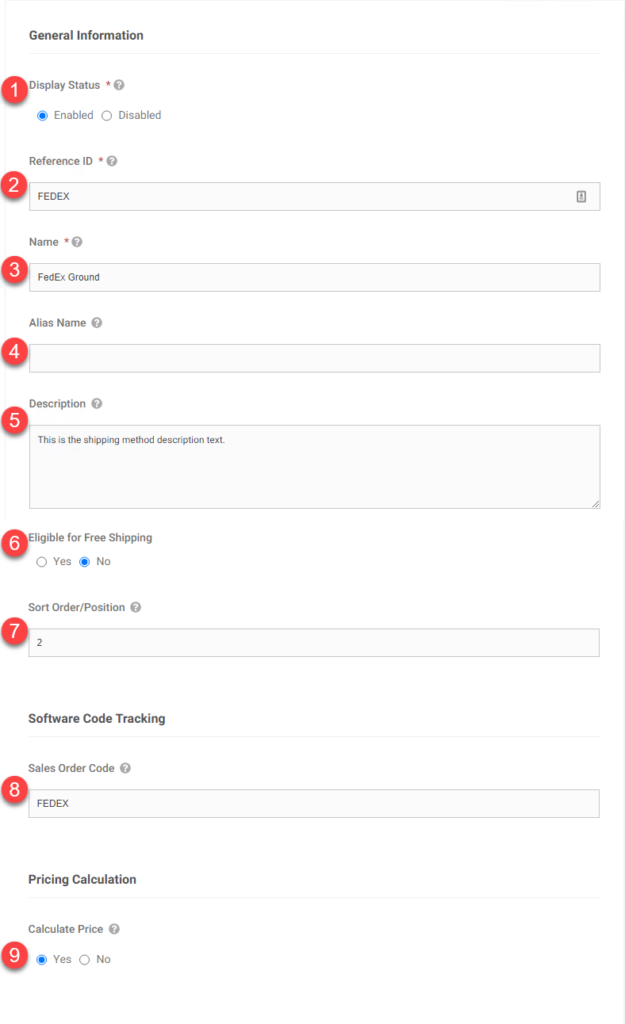
- Display Status – Enabled Shipping Methods are available to display. Disabled methods will never display.
- Reference ID – This is a unique identifier for the record and cannot exist on two different shipping methods. This does not display to to end users. Avoid using spaces and special characters.
- Name – This does not need to be unique and is what displays to end users on the customer site(s)
- Alias Name – Field available to populate for internal (Worker Portal) to assist in identifying the method and its use case.
- Description – Field to provide additional information. This can just be internal or there is a standard setting under the Shipping Settings feature that can enable this field to display to users at checkout when this method is selected.
- Eligible For Free Shipping – This field is associated with features enabled in software bundle – Advanced Shipping Price Calculations. Outside of this bundle this setting does not impact how the shipping method returns information.
- Sort Order Position – You can use this to control the display order of the shipping methods shown to the user at checkout. This only works if the Shipping Settings feature setting is set to either Position Ascending or Position Descending.
- Sales Order Code – This is the value passed into the ERP order (Sage100 – Ship Via) when the method is selected for the order. If blank this field is blank on the order.
- Calculate Price – If you are wanting the method to return a value based on the additional set-up to follow then select Yes. If you are just wanting users to be able to select a shipping method and are not presenting a cost for the particular method then select No.
Rate (External)
If you are wanting to return rates from UPS or FedEx the select the External Lookup button and the following options will allow you to select the specific external method from the carrier to call.
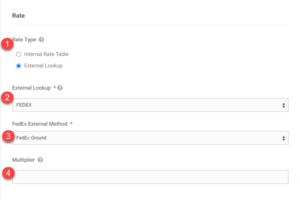
- Rate Type – For external Rates select External Lookup
- External Lookup – This is where you select UPS or FedEx
- UPS/FedEx External Method – The dropdown will have the available options for that carrier. It should be noted that for FedEx there are two separate methods for standard ground shipping based on if the address entered is flagged as residential or not. An address flagged as residential will not return FedEx Ground and an address not flagged as residential will not return FedEx Ground Home Delivery. Typically we recommend customers set up a method for both of these an call them both FedEx Ground as only one of these will return for a given shipment.
- Multiplier – This allows you to adjust the rate returned by a multiplier. If you want to just use the rates returned then enter 1. If you want to increase by 10% then the multiplier would be 1.1. If you want the rates to be a fraction of the returned rates then the multiplier would be less than 1.
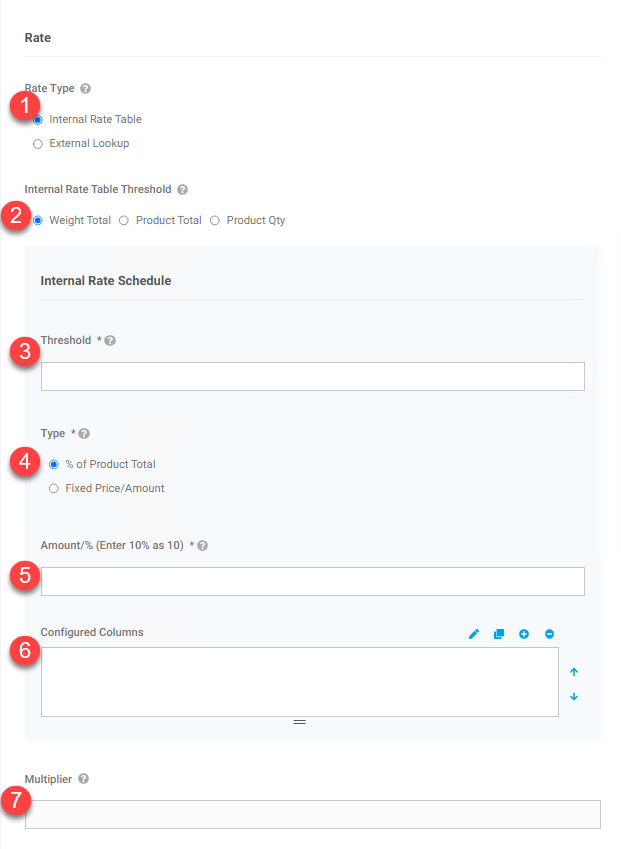
Rate (Internal)
This allows you to set up up an internal rate structure versus making a call out to UPS or Fedex.
-
- Rate Type – To set up an internal rate structure set this to Internal Rae Table. An internal rate structure allows you to set up rates without making external calls to UPS or FedEx. The following fields show the available options for for setting up this structure.
- Internal Rate Table Threshold – This is what the rate table is based on and what the values entered in the next field, Threshold, apply to. The possible values are:
- Weight (the total weight of the items in the particular shipment/order. The weight pulls from the standard weight field on the product which is typically synced from the ERP)
- Product Total ( The total product price on the order/shipment)
- Product Qty (the total quantity of items for the order/shipment)
The following 3 fields (3, 4, and 5 above) can be used to create multiple entries. After entering the three values click on the small plus sign above the Configured Columns section (Marked as 6 in the image above). The plus is one of the options to the right. This allows you to build out a table with different structures based on the particular value for the Internal rate table Threshold.
-
- Threshold – this is the starting value of the chosen Internal Rate Table Threshold selected. The first entry is typically going to be 0 and subsequent entries will be the starting value for the next line in the rate table being created. So if you chose Weight in 2 above, the value here would be the starting value for the order/shipment weight and will apply up to the next entry in the table. If you just create one entry starting at 0 then the subsequent values will apply to any order.
- Type – this is how the shipping cost/value is calculated. The options are:
-
- % of Product Total – Choose this if you are wanting to calculate the shipping cost based as a percentage of the Internal Rate Table Threshold value. This is typically used mainly with the Product Total Option. This would allow you to set the particular shipping costs as a percentage of the order/shipment total price.
- Fixed Price/Amount – This allows you to set a fixed cost for the particular table tier.
-
- Amount – This is the particular value based on the Type selection. If Percentage was selected then a 10 entered here would be 10% and if Fixed was selected before a value of 10 would mean a fixed value of $10 would be applied as shipping cost for this table tier.
- Configured Columns – This will show the list of values set up using the three previous options noted. You can use the icons to the right to Edit, Copy, Add, or Delete options.
- Multiplier – This allows you to apply a multiplier globally to the value returned in from the rate table.
Filters and Shipper Account Collection
This section allows you to enter criteria to filter the entire shipping method by. If the order does not meet the order criteria it will not display to users as an option at checkout. The available filter options are Weight, Price, and Geographic Location of the Shipping Address on the order.
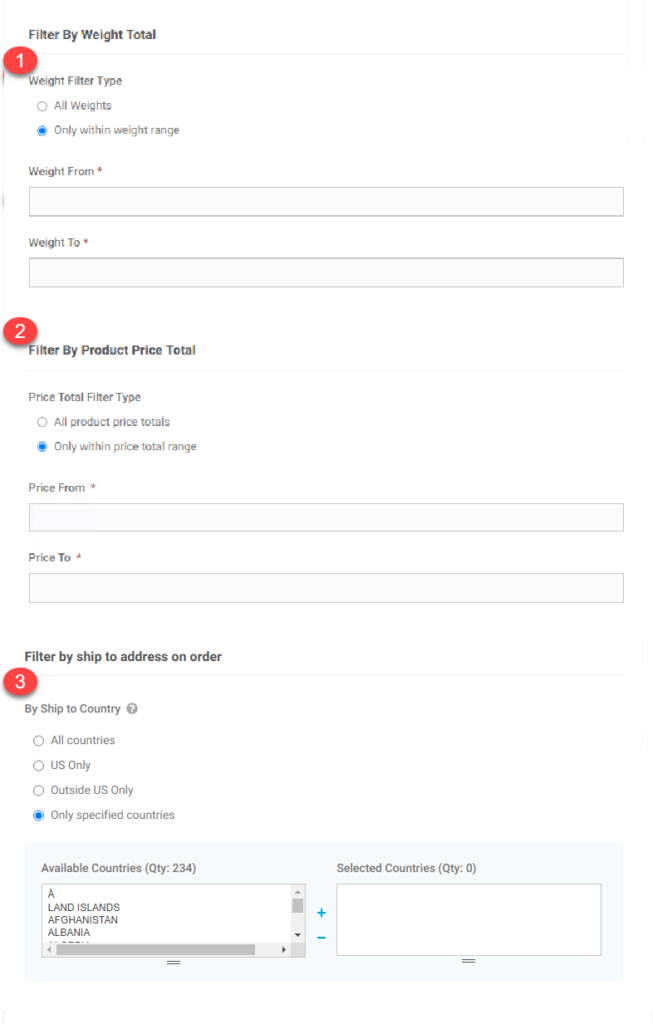
- Filter By Weight Total – All Weights means this method will display no matter what the weight on the order. If you only want this particular method to display for a specific weight range then select Only Within Weight Range and enter the weight range values.
- Filter by Product Price Total – All Product Price Totals means this method will return no matter what the total shipment value. If you only want the method returning for a specific range of shipment price totals then select Only Within Price Total Range and enter the desired range.
- Filter By Ship To Address on Order – This allows you to filter the specific shipping method based on the shipping address selected. If you want the method to show for all orders select All Countries otherwise select the specific options that match the desired restrictions for this shipping method.
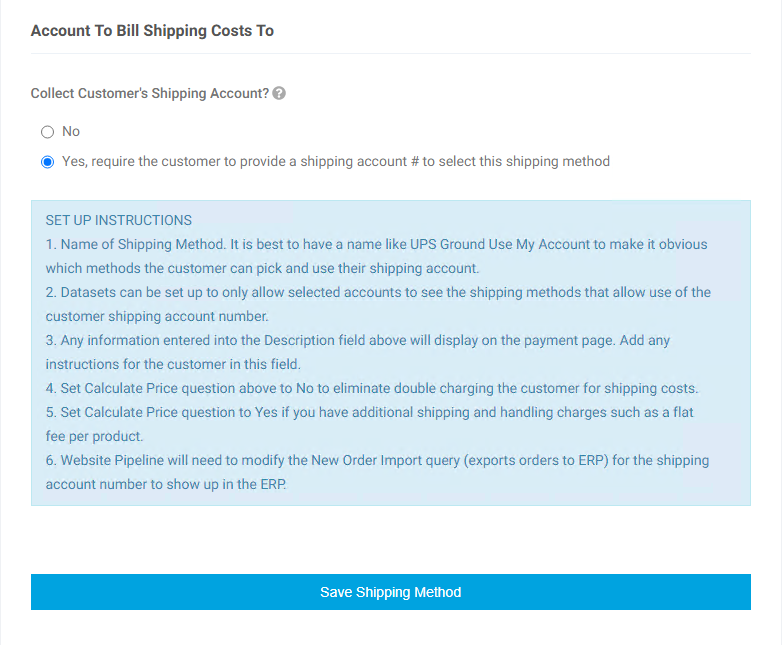
Use Shipping Method to Collect End Customers Shipping Account
This final section allows you to set up the shipping method to collect the Carrier/account information from the end customer to use their shipping account with the carrier to bill them directly. The particular set-up for doing this is in a separate article – Shipper Accounts