Overview
Advanced Tabs enables product information on the product detail pages to be presented in a tabular format instead of requiring the customer to scroll down the page to view additional data.
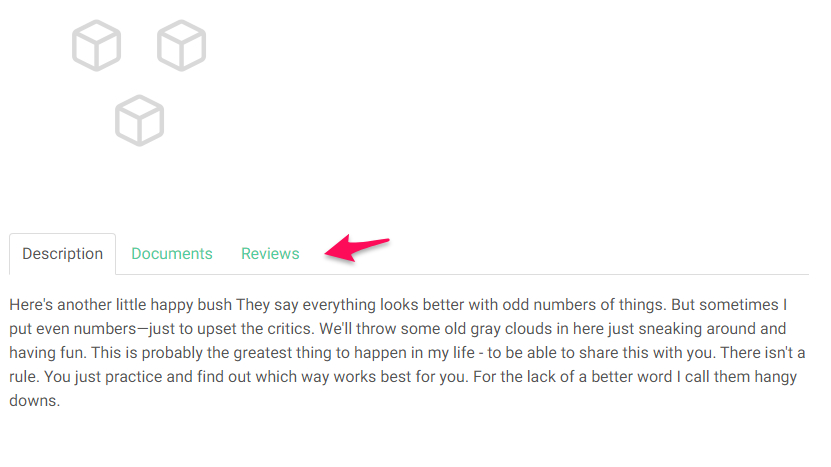
What a Customer Sees
Products set up with advanced tabs will display tabs directly below the main product image. Product tabs will only display on the product detail page.
Setup
Enabling Feature
A worker can complete the following steps to enable the advanced tabs feature.
- Navigate to “Settings Workspace” > “System-Wide Settings” > “Application settings”
- Click “Features” > “Quote / Ordering” and a list of application settings will display
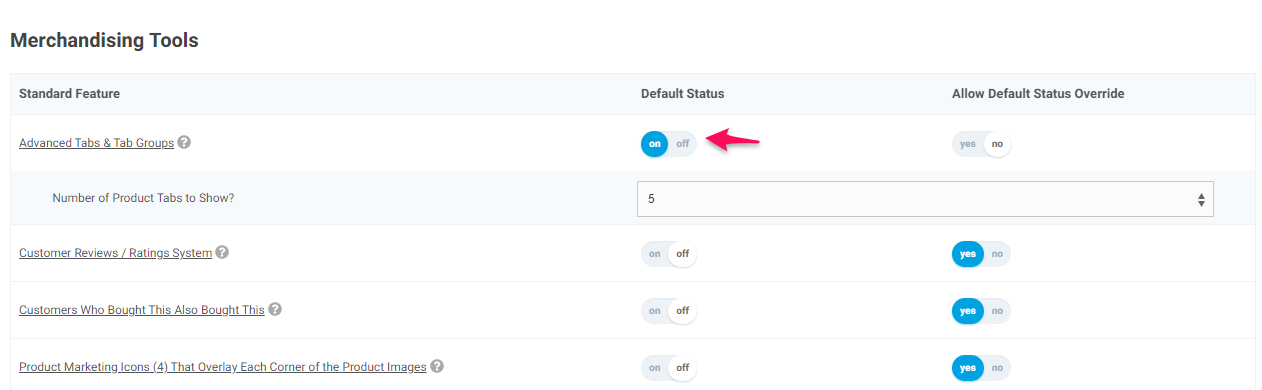
- Scroll down to section “Merchandising Tools”
- On feature “Advanced Tabs & Tabs Groups” toggle the default status to “ON”
- Once enabled, a set of additional configuration options will display below “Advanced Tabs & Tabs Groups
Configuring a Product to Use Advanced Tabs
This section will walk through setting up a product to use advanced tabs and assumes the feature is enabled.
- Navigate to “Product Workspace” > “Product Catalog” > “Products” and find a product to edit.
- Click “Edit” under the actions column.
- You should be on the product edit page at this point.
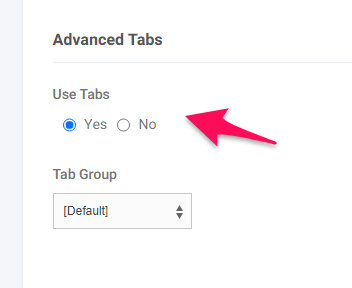
- Scroll down to the “Advanced Tabs” section
- Under “Use Tabs” select “Yes”
- A drop down for “Tab Groups” and a section for “Advanced Tab Overrides” will display when “Use Tabs” is set to “Yes”.
- Tab groups are covered in detail in the section “Configuring Tab Groups”
- The Advanced Tabs Override section (immediately following) displays fields for configuring up to eight tabs for the product detail page.
- Each tab has the following settings
- Label (override) – defines the text to appear on the product detail page (shown on right).
- If using tab groups, this overrides the “Label” specified in the tab group.
- Dynamic Content Source (override)”- is used to add dynamic content to the tab contents. This field overrides the content that exists for Tab Group data. When dynamic content is inserted on a tab where static content also exists, the static content can be designated to appear above or below the dynamic content. Examples of content that can be inserted into a tab:
- Use Orignial – The content from the same tab as configured in Product Tab Groups will be used on this current product (unless changes are entered in one of the “(override)” fields
- None – Only content entered in the “Static Content” field will be displayed in the tab on the product detail page.
- Description – The content of the “Desciption” field on the product add-edit page will be displayed on the tab.
- Downloads – The links for document downloads will be relocated from the standard location under the SKU: to display on the designated tab on the product detail page.
- Webpage – The information on a content page as created using the Pages task in the Content menu of the Content Workspace is displayed on the tab. This can be a URL to content such as a product brochure, a MSDS sheet, or a YouTube video.
- Related Products – Products added to the Suggested / Related Products field on the product will display in this tab (versus the bottom of the product detail page). Suggested / Related Products to display are configured on the product detail page.
- Reviews/Comment – When customer reviews are enabled for the website, submitted reviews display on this tab.
- Smart List – Smart lists are created dynamically for an account. They are composed of history data (Invoices and Sales orders). The standard user interface displays the information (most recent order date, qty, invoice, etc.) displays on a category combined results, product detail, and certain data display pages (invoice quantity, purchase history). Be cognizant of the amount of information when selecting to display this on a tab.
- Hook – When the website owner requests creation of custom content on website pages, CIMcloud Pro Services will provide the software “hook” code that inserts the content. That content can then be displayed on a tab.
- Static Content Position – specifies where static content should display in the tab relative to dynamic content.
- Static Content – freeform content field that allows adding static content to the tab. The placement of the content is based on “Static Content Position” field.
- Label (override) – defines the text to appear on the product detail page (shown on right).
- Once the tabs have been configured, submit the product edit page and tabs will display on the website.
Configuring Product Tab Groups
Tab groups allow for creating generic tab group templates that can be applied to products. Tab groups should be used on any tab structure that will be used more than once on a product. Using tab groups will make the setup and management easier.
A woker can setup tab groups by following these steps
- Navigate to “Product Workspace” > “Product Catalog” > “Product Tab Groups”
- By default, a few pre-configured tab groups will display on this page. It is recommended to leave these groups for reference purposes and create net new groups for your site’s usage.
- Click “Add Tab Group” button in the top right of the page
- Fill out the tab group settings and submit page.
- The tab group settings are a subset of the settings found on the product page.
- Any field populated on the tab group would be used on the product unless the product has the tab setting overwritten.
- This page will only display the number of tabs specified in the feature setting. Update the feature setting to include more tabs if there are not enough tabs for your use case.
- Before moving forward, the assumption is a “Tab Group” has been created.
- Navigate to “Product Workspace” > “Product Catalog” > “Products”
- Find a product to add tab group and click “edit” under actions
- Select the tab group created in step 3 on the “Tag Group” dropdown.
- Note that use advanced tabs must be selected for “Tag Group” drop-down to display.
Configuring with Uploads
Advanced tabs can be set up using CSV uploads which can make the setup more efficient if updating a large data set.
- General Information for both uploads
- Tab Numbers
- Every tab will have the same fields. The only difference per tab is the number appended to “tab” in the field name. The number determines what tab the setting applies.
- {{tab number}} in the upload documentation refers to this number.
- Tab Numbers
- Tab Groups Upload
- If using tab groups, this upload should be completed to set up or update tab groups. If creating new tab groups, this upload should be completed prior to Product Upload.
- Notable Fields in Upload
- tab{{tab number}}_dynamic_content_source
- Determines where to load content for tab from.
- Possible options:
- none
- description
- downloads
- web_page
- related_products
- rys
- reviews
- smart_list
- hook
- tab{{tab number}}_p_id
- If dynamic_content_source is “web_page”, this field determines what web page to display.
- Value should be web page key or ref_id.
- tab{{tab number}}_dynamic_content_source
- After updating, this file should be uploaded to “Tab Groups” table
- Product Upload
- Notable Fields in Upload
- show_tabs
- Used to display tabs. The field must be 1 or True for tabs to display.
- tab_settings_group_id
- Determines what tab group should be used for product.
- Value should correspond to tab group key or ref_id.
- tab{{tab number}}_html
- Used for static content displayed in the tab specifically for the product.
- tab{{tab number}}_label_override
- Used to override the label populated on the tab group.
- show_tabs
- After updating, this file should be uploaded to “Products” table
- Notable Fields in Upload