Overview
This article covers suggestions and best practices on the tactics you can use to implement, test, and roll-out (take live) hidden features when the following conditions are both true:
- You are already live on the CIMcloud platform (customers and/or workers are using it), AND
- You have non-live features that you want to start using
Features are everywhere in CIMcloud. The base CIMcloud platform includes hundreds (or thousands) of features. Optional add-on bundles all contain one (1) or more features (most contain a lot more). A few examples of features are:
- Allow Saving Carts
- Abandoned Order/Cart Email
- Requested Ship/Pickup Date is Collected From Customer
Hidden (Turned-Off) Features
For the purposes of this article, we are using the term “hidden features” to include any feature that is currently available for you to use, but turned off. These features are NOT in use by your customers (or possibly your workers… depending on the feature) but are included in the scope of software bundles that you are currently paying for.
Hidden features could include any or all of the following:
- Features included in new software add-on bundles that you just purchased (by default, we don’t turn them on for everyone to use… you will do that when you are ready).
- Newly released features that were added to the base platform or add-on bundles that you already pay for (these features added to the latest version of CIMcloud by the CIMcloud product R&D teams).
- Features that are part of the software you already pay for, but are currently turned off.
Why Do I Need Special Tactics for This?
Most CIMcloud features, that are currently hidden on your platform, require special tactics to safely implement, test, and roll-out to your users without negatively impacting them.
You are attempting to set up, test, and roll-out these hidden features on the Live copy of your CIMcloud application. Stated another way, your hidden (turned-off) features are using software code that is live, data that is live, images and files that are live, and the ERP data sync that is live.
Prerequisite Articles
You will need to understand the information presented in the following articles, before you can fully understand what is presented here (and why). Note: Implementers / Operators will need to thoroughly understand this content. Project Managers and Project Planners will need a basic understanding of this content. Program Managers should become generally familiar with the concepts.
- CIMcloud Environments Overview
- This article covers the different copies of your CIMcloud application can run in. This includes: 1) software code environments (production and staging), 2) the databases/data environments (live and sandbox), 3) the images/files environment (live), and the erp sync environment (live).
- This article is intended to help you understand 1) how to distinguish between the live, preview, test, and sandbox copies of your CIMcloud application, and 2) how changes in each of the non-live copies can actually (in some cases) impact your live data and images/files.
- Features & Settings Basics
- This article (and video) covers the features and settings framework that drives whether or not features (and their settings) are seen by none, some, or all of your users (workers and/or customers). This framework is the primary underlying tactic that will be used to implement, test, and roll-out hidden (turned-off) features.
Feature Basics / Terminology
The following sections introduce some basic terminology and concepts related to features to help you understand the tactics suggested.
Feature Toggles
“Feature toggles” just refers to mechanisms or “switches” we use to turn features on and off in CIMcloud. Some features can only be turned on or off system-wide (everyone gets them or no-one gets them) while others can be seen/used by a sub-set of your users (workers and/or customer contacts).
The way features are “toggled” involves two different switches that are seen in the features & settings interfaces. Understanding what the switches do / how they work is critical for when walking through the feature lifecycle stages listed below.
Switch #1: Default Status
The default status determines whether the feature is “off” by default (could be used by some if overrides occur, but otherwise will not be used) or “on” by default (all users will see it, unless other setup things happen to deny it for some users).
- This switch is found in two places in the Worker Portal:
- Settings Workspace > System-Wide Settings > Application Settings
- Settings Workspace > System-Wide Settings > Workspace Settings
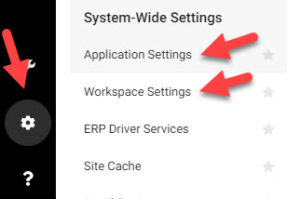
- The switch is label “Default Status” and is located next to each feature

Switch #2: Allow Default Status Override
This determines whether the feature can be turned on or off for a sub-set of users (workers or customers). This is controlled by the “Allow Default Status Override” switch located on the same pages as listed above.
The following provides details on what happens with the two switches in combination.
- Disabled For Everyone
- Default Status = Off
- Allow Default Status Override = No
- Or… the Allow Default Status Override switch does not exist (which means the feature is only a globally controlled feature)
- Enabled and On By Default
- Default Status = On
- The Allow Default Status Override setting creates the following conditions:
- Yes = The feature will be ON unless it is denied through a customer site, customer group, or worker group.
- No = The feature will be ON and can NOT be turned off through a customer site, customer group, or worker group.
- Switch does not exist = The feature will be ON and can NOT be turned off (because a site or group level override is not possible).
- Enabled and Off By Default
- Default Status = Off
- Allow Default Status Override = No
- Note: This combination of settings means that this can be turned on through sites or groups, but the only users that will see this feature are those that actually get it applied through a customer site, customer group, or worker group.
Feature Roll-out Via Lifecycle Stages
The following is the suggested set of lifecycle stages to use to 1) take one or more hidden features from Disabled to Fully Live, and 2) make it clear to all workers and business stakeholders which stage each feature is in as you progress through and complete your project (to get the feature fully live).
Lifecycle Stages
Not Purchased
The feature is available for purchase, but is not seen or deployed on your CIMcloud platform.
Hidden (Purchased)
- Stage 0: Disabled – The feature is not in use.
- Default Status = Off
- Allow Default Status Override = No (or the status override switch does not exist)
- Stage 1: Enabled – The feature is ready to go through the remaining implementation and roll-out stages.
- Default Status = Off
- Allow Default Status Override = Yes
- At this stage, no sites or groups have this feature turned on.
- Stage 2: Test – the feature has been applied to one or more test sites or groups for the purpose of checking your work / progress as you are completing the implementation and testing steps.
- Default Status = Off
- Allow Default Status Override = Yes
- At this stage, 1 or more “Test” customer sites, customer groups, or worker groups have this feature turned on.
- We recommend actually adding “Test” at the beginning or end of the site or group name to help make it clear what that group (or customer site) is being used for / where it stands.
Beta Live
- Stage 3: Beta – This is the first step of actually live usage (note: you may choose to go through several waves of beta testing while increasing the qty of users that beta test in each wave). The feature has been applied to a limited number of (typically) invite-only workers and/or customers through the use of a “Beta” customer site, customer group, or worker group. It is best practice to i) let the beta users know they are part of the beta group, and ii) ask them for feedback.
- Default Status = Off
- Allow Default Status Override = Yes
- At this stage, 1 or more “Beta” customer sites, customer groups, or worker groups have this feature turned on. The feature should be in a tested and working state before you move it to this stage.
- We recommend actually adding “Beta” at the beginning or end of the site or group name to help make it clear what that group (or customer site) is being used for / where it stands.
- When you get to this stage, you will add the customer group to the specific customer accounts and/or contacts that are part of the beta test. There should be communication action items in your project plan to 1) ask beta users to be part of the test, 2) watch their activity, and 3) collect feedback from them, and 4) incorporate the feedback into action items (i.e. settings or data changes, etc) if appropriate. Note: All of this also applies to beta workers (via beta worker groups applied to the beta worker’s logins).
Fully Live
- Stage 4: Live-Restricted – This is the fully live state for a feature that you only want or need some users to interact with. We recommend this designation so you know that your work/project is done with the feature but it is intentionally NOT turned on for all users.
- Default Status = Off
- Allow Default Status Override = Yes
- At this stage, the feature should be completely set up, with no known issues, and working properly (it has passed through the Test and Beta stages). The feature is rolled-out to all target users and is no longer part of an implementation project.
- We recommend actually adding “Live-Restricted” at the beginning or end of the group name to help make it clear what that group is fully live (and no longer in an implementation project), but was intentionally not set up as a system-wide feature (i.e. you have no intentions to ever make it available to all users).
- Note: You may also move the feature settings to a pre-existing group or customer site to officially take it live. In this case, you will no longer need the designated group for the feature and can remove it (after you have confirmed you no longer need it).
- Stage 5: Live – This is the fully live state for a feature that has system-wide availability (everyone can use it).
- Default Status = On
- Allow Default Status Override = Yes or No
- At this stage, the feature should be completely set up, with no known issues, and working properly (it has passed through the Test and Beta stages). The feature is rolled-out to all users by default (with only a select group of “deny” users not getting it… if applicable) and is no longer part of an implementation project.
Use of Prefixes on Group Names
As suggested in the stages above, we recommended using prefixes on group names to designated which stage that feature or group of features is in. This is especially important for the TEST and BETA stages.

Feature Building Blocks
These are the “building blocks” that are turned on and off when features are “toggled”. Most features have some of these building blocks (very few have all of them). It is important to understand whether the building blocks (associated with each feature) are globally turned on (when the feature gets to the “enabled” stage above ) or if they are turned on progressively (through customer sites and groups as described in the test, beta, and fully live stages listed above). This provides a quick summary of what you can expect.
- Parts of Pages / Interfaces – This is the features that you visibly see on customer sites or in the worker portal. Generally, these are directly tied to the feature toggles and are progressively seen by users in each stage.
- Moving Parts – The moving parts associated with a feature are turned on (globally) as soon as the feature is enabled. This includes:
- Moving Parts: System Emails
- Moving Parts: Data Moves
- Moving Parts: ERP Syncs (a.k.a. ERP Configs)
- Navigation Links: Customer-Facing – Links included in the standard CIMcloud retail and B2B portal templates are typically part of the payload that is rolled out progressively.
- Navigation Links: Worker Portal – Links in the Worker Portal are part of the payload that is rolled out progressively.
- Data Records: Product, Content & Settings – Data records are typically global (seen by everyone immediately). The only exceptions to this are:
- Data Tables Using Data Rights – if you have the Advanced Data Filtering / Data Sets (Y) Bundle, some of the tables of data you manage may allow you to progressively roll-out new records that you need for the hidden feature using Data Rights (i.e. products, categories, shipping methods, etc).
- Data Tables Only Used By the Hidden Feature – if you have data tables that are solely used by the hidden feature, then adding records in those tables should not impact any fully live features. This typically applies if the entire worker portal navigation link (the manage and add links) show and hide with that specific feature.
Note: Any data that is customer-owned/entered data can be tested by using test customer accounts and contacts (this will prevent the data from being seen by other users).
Need Help?
The implementation of new features on a live application can be tricky. If you need expert help, contact a CIMcloud Customer Success manager for an intro to a partner or our in-house pro services group for help.
Hidden Feature Implementation Too Risky?
In most cases, hidden feature can be successfully implemented and roll-out using the above lifecycle stages and tactics. With that said, there are cases (particularly with complex add-on bundles being applied to a high traffic platform) where doing your hidden feature implementation work on the live copy of your CIMcloud application is too risky. If that is the case, one or both of these two options may make sense. Both options require additional fees.
- Using a Project Sandbox – this is a copy of your live site and database created to isolate the work associated with a project. Some limitations apply, but this may be a good option to consider.
- Help from CIM Pro Services – a technical resource from our in-house pro services group may be able to help design a non-typical strategy to safely implement your hidden features.
Feel free to contact us via a support task for more details.