Overview
CIMcloud offers optional add-on software bundles to extend the features and capabilities of your CIMcloud platform. Along with enabling new features that your Workers and Customers can use, many of the add-on software bundles also require changes to the data sync with your ERP/accounting system and changes to the settings data that runs your CIMcloud application. These data changes introduce a little more complexity and risk than just “flipping a switch” to turn on those add-on software bundles. Managing this risk and complexity is particularly important if your CIMcloud platform is live with heavy usage. This article covers the process of adding new software bundles to your CIMcloud platform to safely get from placing the order to your live roll-out of the features.
Target Audience for This Article
The article is intended for CIMcloud customers that are live on (or already implementing) the CIMcloud platform and just purchased additional add-on software bundles.
Note: Any optional software bundles purchased with your initial CIMcloud order do not follow this process, as they are installed / deployed at the same time as the base platform. You can go to the following article if you are starting a new CIMcloud implementation process.
Process Overview
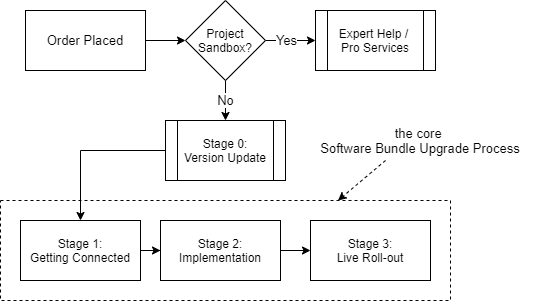
This diagram is a high-level overview of the process we follow to upgrade your existing CIMcloud platform with newly purchase add-on software bundles.
Diagram:
Process Steps:
This provides a quick description of each of the steps listed above. See the Process Details section below for a breakdown of each step.
- Order Placed – This process starts when you place an order with a CIMcloud Account Manager for the add-on software bundle(s) that you want. Applicable initial software / connector fees will be collected with the order and the monthly fee price increase will be automatically applied.
- Project Sandbox? [requires additional fees and work] – You can work with your CIMcloud Account Manager to determine if using a Project Sandbox to “dry run” the deployment and implementation of a new bundle makes sense (when weighing the extra costs & time involved vs. the risk mitigation you get).
- See “What’s A Project Sandbox?” section below for more details.
- [if applicable] Expert Help – If you choose to use a Project Sandbox, you will need to work with Expert help (i.e. the CIM Pro Services team), via a billable engagement, to walk through a custom process to complete a “dry run” on Sandbox and then the live deployment, implementation, and roll-out on your Live CIMcloud environment.
- Stage 0: Version Update – If your Live copy of CIMcloud is not currently on the latest release, CIMcloud will work with you to complete the Version Update Process (as a prerequisite step). Once you are on the latest version of CIMcloud, you can proceed with the actual stages of the software bundle upgrade process. This provides the most stability and insures you get the latest features & capabilities.
- Stage 1: Getting Connected – In this stage, 1) you will assemble your core team, 2) CIMcloud will work with you to collect any deliverables/settings/preferences needed, 3) CIMcloud will complete & test the deployment of the bundle, and 4) CIMcloud will send you information on i) the bundle setup, and ii) how to see the new features on a preview worker login and/or a preview customer login.
- Our “Pro-Services Assisted” bundles require you to purchase a pro services allowance (from the CIM Pro Services Group) to get expert help on some of the deployment (ERP sync) and data & configuration setup and planning. See the “Pro-Services Assisted Software Bundles” section below for more detail.
- Stage 2: Implementation (Self-Service) – Your Implementer(s) will access the Worker Portal and walk through the setup (in the product, content, and settings workspaces) and testing of the new features. You can assess on-demand help from CIMcloud by submitting a task through our extranet help desk system.
- Stage 3: Live Roll-out – The Live Roll-out is just the process you follow to turn the new feature(s) on for all of your users (Workers and/or Customers). Typically, your Implementer(s)/Operator(s) will work with the people in charge of customer and worker training and adoption to plan the roll-out. For complete details on how to “turn on” or roll-out the new features to your users, read Rolling Out Hidden (Turned Off) Features after Go Live.
What’s A Project Sandbox?
A Project Sandbox is a copy of the CIMcloud application (with all of your customizations) connected to a copy of your database / data that is used to install and test changes in a way that is isolated from your live copy of CIMcloud. Changes to any large software platform involves risk. Some of our add-on software bundles are risky to install directly on a live environment because they require significant data changes to ERP sync and settings data that could jeopardize the stability of your live system (while the bundle is being deployed and implemented).
A Project Sandbox involves additional cost and work, but may be an approach you decide to take to reduce risk by first doing a “dry run” of the deployment and self-service implementation. This dry run allows you to learn the new bundle, including preparing and testing all of your settings and content changes before installing those changes on the Preview copy of CIMcloud (which used your Live database / data).
There are rare cases, with certain complex software bundles, where a Project Sandbox is required. It is always an option you can choose (if it’s not required), but in many cases does not make sense to pursue. Your CIMcloud Account Manager can discuss these risks with you, along with whether or not adding the Project Sandbox steps to your project will actually mitigate the risks in a way that makes sense for the added time and costs.
To learn more about Sandboxes, read the CIMclould Environments Overview article.
Pro-Services Assisted Software Bundles
Some of our add-on bundles have complex data setup, technical configuration, and ERP sync’d data requirements. We consider these “Pro-Services Assisted” add-on bundles. On these bundles, we require a pro services allowance (hourly billable allowance) to be purchased so you can access expert help for some of the deployment needs as well as planning / mapping out your strategy to implement and roll-out the new features. You may also choose to purchase additional consulting, on top of the required allowance, to help your team get through Stage 2 and Stage 3. Your CIMcloud Account Manager will notify you during the sales process if the bundle you are considering requires pro service help.
Process Details
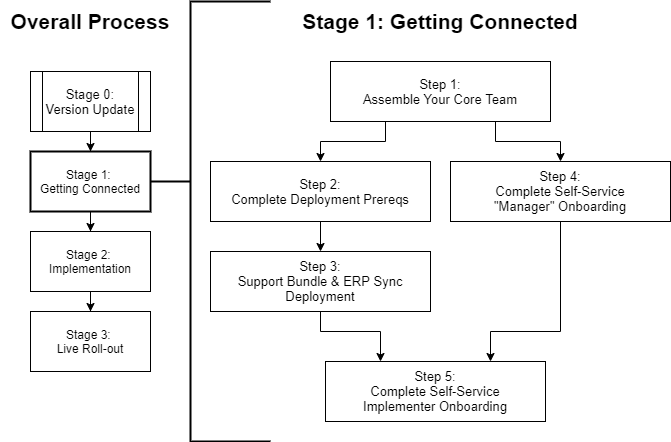
Stage 1: Getting Connected
Diagram:
Steps:
- Step 1: Assemble Your Core Team
- Implementing an add-on software bundle is a project and should be treated as one to maximize your chance of success and return on investment. Some projects will be small (if it’s an easy / mostly hands-off bundle or if you are only implementing one small feature in a bundle) and some can be quite large (like implementing multiple ERP company files, product configurator, or enterprise search).
- In order to have a successful project, you should have the “Big 3” critical roles filled.
- The roles need to be filled with people that GWC (Gets it, Wants it, Capacity to do it) the role. If they don’t, you will have problems.
- Role #1: Identify / Confirm the Program Manager
- Role #2: Identify / Confirm the Project Manager
- Role #3: Identify / Confirm the Lead Implementer
- Step 2: Complete Your Deployment Prerequisites
- Some bundles have deployment prerequisites (typically around ERP Sync settings). If applicable, the CIMcloud Customer Success Manager will provide you with a list of prerequisite tasks / questions to complete.
- Step 3: Support the Bundle (& ERP Sync) Deployment
- The CIMcloud deployment team will handle the deployment of the optional bundles you purchased, including the standard ERP sync changes, showing the bundle features on a preview Customer and/or Worker login (so the features are hidden from everyone else until the live roll-out), and testing / validating the features. We will reach out to your team for support with the ERP sync tool install if needed.
- Note: If the software bundle you purchased is a “pro-services assisted” bundle (you will be notified of this during the sales process), the CIM Pro Services group may be involved in this deployment step (particularly the ERP sync portion).
- Note: If a bundle requires 3rd party involvement (i.e. the DM2 Bundle), that 3rd party should be notified at this time to schedule their work.
- Step 4: Complete the Self-Service “Manager” Onboarding
- People filling one of the manager roles for this new add-on bundle project should either 1) refresh themselves by scanning the content in their onboarding checklist (if they have been through it before), or 2) thoroughly consume the content on their onboarding checklist (if this is their first time seeing it).
- Task (Program Manager): Complete the Program Manager Onboarding Checklist
- Task (Project Manager): Complete the Project Manager Onboarding Checklist
- Task (Project Planner): Start Building Your Project Plan / Task List
- Start your project plan by walking through the The 3 Steps To Set Up Your Project.
- Note: You may want to work ahead now (see tasks in Stage 2: Step 1 and Stage 2: Step 2) to complete the project plan. If not, you will complete it when you get to Stage 2: Step 2 below.
- Task (Project Manager): Establish Your First / Next Project Check-in Call (Meeting)
- Step 5: Complete Implementer Onboarding
- Anyone on the team that is filling an Implementer Role to help set up and test the new bundle(s) / feature(s) should either 1) refresh themselves by scanning the content in the implementer onboarding checklist (if they have been through it before), or 2) thoroughly consume the content on the implementer onboarding checklist (if this is their first time seeing it).
- Implementer Onboarding Checklist (Implementer)
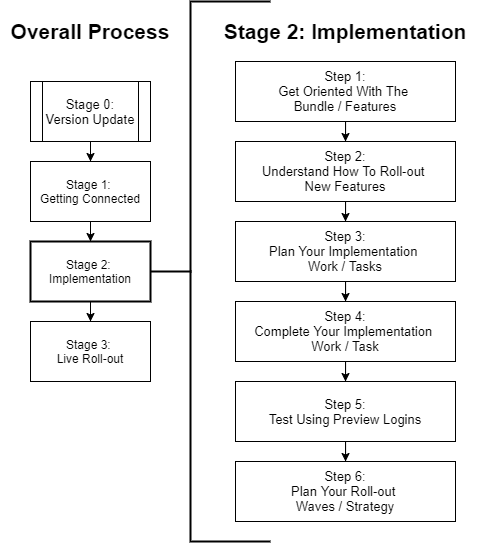
Stage 2: Implementation
Diagram:
Steps:
- Step 1: Get Oriented with the Bundle / Features
- Task (Project Planner & Implementer): Read the Help Center Article on the Bundle Your Purchased
- Note: If an article is not available, a CIMcloud Account Manager can walk you through the bundle features upon request.
- Note: The “moving parts” that are associated with the features (including system emails, data moves, and ERP data syncs) are turned on globally and will be live as soon as you turn on the feature. Also, before adding data records associated with the new features (in the product, content, or settings workspace), make sure you avoid surprises by understanding how they impact your live site. For example, the Abandoned Order / Cart Email feature (part of the Merchandising Tool Bundle (D)), when turned on, will immediately start running for all customers on the customer site it is running on.
- Task (Project Planner & Implementer): Read the Help Center Article on the Bundle Your Purchased
- Step 2: Understand How To Roll Out New Features
- Task (Lead Implementer, Project Manager, and Project Planner): Read & Understand Rolling Out Hidden (New) Features After Go Live
- If you are already live on the CIMcloud platform, understanding best practices on implementing and progressively rolling out new features is critical to maintaining stability for your users (Workers and Customers). The above article walks through some basic concepts and a suggested set of lifecycle stages (and the tactics involved to set them up) to get the feature from disabled to fully live. If you want additional expert help on your plan / overall strategy to implement on your live platform, you can seek help from an implementation partner or from our in-house CIM Pro Services group (additional professional services fees apply).
- Task (Lead Implementer, Project Manager, and Project Planner): Read & Understand Rolling Out Hidden (New) Features After Go Live
- Step 3: Plan Your Implementation Work / Tasks
- Task: Decide on Features to Implement (Program Manager and Lead Implementer)
- Many bundles have a collection of features. It is common to only focus on implementing a rolling out a sub-set of the features in the bundle (the ones you are most likely to get value from). The first step is to decide which of the features you will implement.
- Task: Make Strategy Decisions on Features (Program Manager and Lead Implementer)
- Some features or entire bundles have strategic “business” decisions that need to be made related to what you are going to do with the feature. Someone that understands what the bundle / features can do + what your business goals / objectives are will need to make the strategic decision on what you want to accomplish. This will directly relate to the work you have to do to implement the feature. For example, when implementing the Inventory Display Profiles feature of the Product Inventory Tools (Bundle C), you have to decide if you want your customers to see actual quantity available on products or just a “in stock” or “out of stock” status or a combination of both (varying by product). Those are business decisions on outcomes that will impact the actual implementation and testing work that you have to plan and do.
- Task (Project Planner, with Lead Implementer): Complete Your Project Plan / Task List
- Your project plan should have been started in Stage 1: Step 4 above. If not, you can catch up (or finish it now) by building a project task list / plan that factors in the decisions from the above two tasks (which features and strategy decisions on each). Be sure to read ahead in this article and include the implementation, testing, and live roll-out work suggested in the steps and stages below.
- Task: Decide on Features to Implement (Program Manager and Lead Implementer)
- Step 4: Complete Your Implementation Work / Tasks
- Task(s): Complete Work in the Settings, Content, and Product Workspaces
- Tip: Per the Roll-out Hidden (Turned Off) Features After Go Live article, use “TEST” groups on your worker login and test customer contacts to get your setup completed.
- Task(s): Complete Work in the Settings, Content, and Product Workspaces
- Step 5: Test Using Preview Logins
- Tasks: Complete Thorough Internal Testing on Your Test Logins
- Note: When implementing features that impact critical workflows (like product searching, adding to cart, and ordering), be sure to go all the way through the workflow (including seeing data – like orders – sync into your ERP system).
- Tasks: Complete Thorough Internal Testing on Your Test Logins
- Step 6: Plan Your Roll-out Waves / Strategy
- Task: Determine Who Will Be In Your Beta Test Group
- If you can, start with your workers (employees) first, then move to invited lists of customers. Be sure to 1) ask them ahead of time, 2) notify them when you are turning the feature(s) on for them, and 3) ask for / give them a way to provide feedback, and 4) take the feedback and turn it into action items as needed (i.e. to improve / change / fix settings, content, or product data, etc).
- Task: Determine Who Will Be In Your Beta Test Group
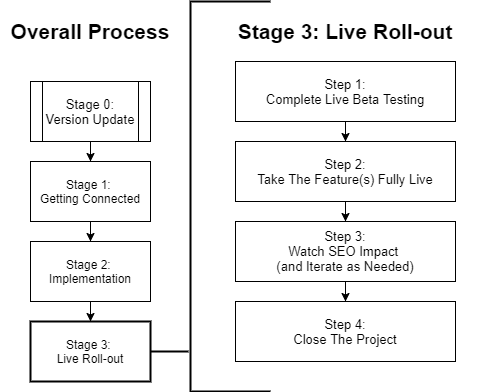
Stage 3: Live Roll-out
Diagram:
Steps:
- Step 1: Complete Live Beta Testing
- Task: Step 1: Apply the BETA Group (of Features) to the Beta Workers
- Task: Step 2: Notify the Beta Workers the the Features are On & Ask for Feedback
- Task: Step 3: Collect Feedback and Make Changes as Needed
- Task: Repeat Steps 1 through 3 for each subsequent wave of beta workers and customers.
- Repeat the steps until you are confident that the new features are stable and operating as intended.
- Step 2: Take The Feature(s) Fully Live
- Task: Apply the New Features / Settings as Needed to “Go Live”
- Note: “Going Live” may involve turning on the features via Application Settings, Workspace Settings, Customer Site(s), Customer Groups, and/or Worker Groups (as determined by your strategy).
- Task: Make Announcements (If Needed) to Your Workers and Customers
- Task: Apply the New Features / Settings as Needed to “Go Live”
- Step 3: Watch SEO Impact (and Iterate as Needed)
- If you have a public-facing site and a material portion of your business comes from search engines and other digital marketing campaigns, but sure to watch the impact of the newly live features on your search engine penetration. Changes involve risk and it’s important to monitor things closely for several months after any material changes are made. You may also want to seek outside expert help with this (note: SEO / digital marketing is not a service that CIMcloud or our pro services group provides, but we do have partners that could potentially help you out).
- This article provides reference materials and checklists for SEO-related work.
- Step 4: Close The Project
- Task: Shut down the project and grab a cocktail!