Overview:
Product categories are an important part of the organizational strategy for your online store. Your customers can use them to find products more quickly through a guided search versus entering random keyword search terms.
They serve as containers for similar products. They can also contain sub-categories to filter searches for more specific product matches. Some examples of common product categories and/or sub-categories would be manufacturer (Sony / LG), gender (mens / womens), age (kids), and product type (toys / tvs / furniture).
Product categories are not imported from the ERP software. They exist only on the platform and are managed in the Product Workspace.
The Process:
- Use the Categories link on the Product Catalog menu in the Product Workspace to add and/or edit product categories.

Use the Product Workspace page when working with a small number of categories. Use the ” + “ icon or the + Add Category button to add a category, as shown below.

Use the Edit link (above) on the category listing to make changes to existing categories.
Categories are organized by levels. Those designated as “top level” (shown below) in the Workspace will display first in the order.

The top-level category configuration shown above will display to customers on the ecommerce site front as shown below.

Categories containing sub-categories have an indicator in the drop list (red circle). The actual appearance of the categories display is determined by your template design.
The Edit link opens the category add-edit page where changes to the values assigned to the category can be entered:
- The position (“POS”) column controls the sort order of the categories in the top level drop list.
- The “STATUS” column is set with the Display Online radio buttons, allowing a category display to be toggled on/off (to temporarily hide the category).
- The Delete link in the “ACTIONS” column will permanently remove the category from the platform.
- Use the “Products in Category” section to add SKUs into a category. Executing this on the add-edit page is efficient when assigning a limited number of products. A partial list for the “Steaks” child category is shown below.

The Imports/Exports link on the Data Imports/ Exports menu is used to assign larger volumes of products to product categories. Larger number of records can be created or edited more efficiently by using the Data Imports/ Exports function in the Settings Workspace.
There are two options for importing the product category data:
- Import using the “product_categories” table. Use the following file schema for that method.
- You are using the category ID as the key field, and uploading all product SKUs in the category, separated with semicolon delimiters.
- You are using the category ID as the key field, and uploading all product SKUs in the category, separated with semicolon delimiters.
- Alternately, import to the “products” table.
- You are using the product sku as the key field and uploading all categories which contain the product, separated with semicolon delimiters. The file schema for that method is:
- You are using the product sku as the key field and uploading all categories which contain the product, separated with semicolon delimiters. The file schema for that method is:


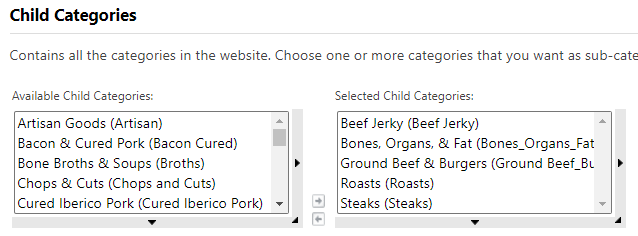
Use the “Child Categories” section of the Category add-edit page to add sub-categories to a top-level category. The available sub-categories are shown in the left pane. Assign sub-categories by moving them to the right pane. The sub-categories for a “Grassfed Beef” top level category are shown below.
Related Sources:
Video from Website Pipeline University. Displays the prior user interface, but the function is identical in the current version is the same.