Below is a screenshot of the search results page. Each section is numbered with a description under the image.
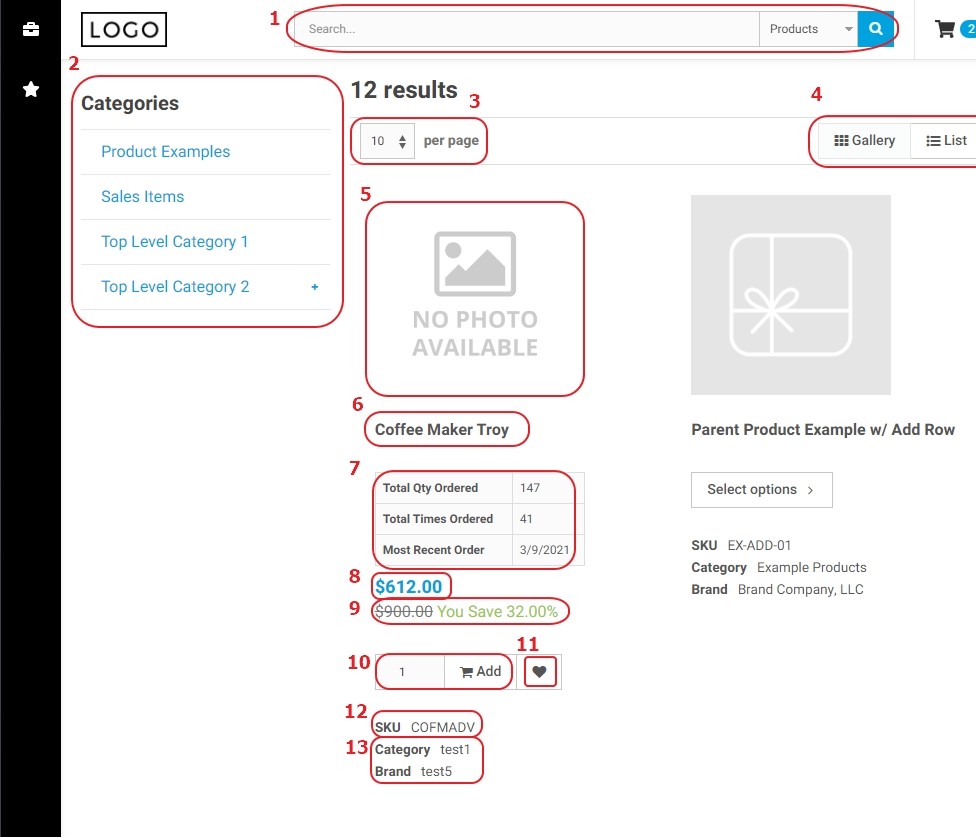
- Universal Search – This will search the product catalog when the dropdown list is set to product. By default it searches across your sku, name, description, and search terms fields. If using parent / child products you can enable a automated rollup of search terms, this will ensure the parent shows in a users search results if they search for something on a child.
- Category Menu – This is build by the application based on your product category structure. This is enabled by default but can be disabled in the application’s settings. (NOTE: If using the faceted search module this menu is replaced by the faceted search window)
- Results Per Page – This drop down allows users to change how many items show up per page in your catalog. This can be configured in the application’s settings. By default this is set to 25 with options of 50 or 100 available to users. You can access these settings by logging into the Worker Portal and going to: Worker Portal > Settings Workspace > System-Wide Settings > Application Settings > Product Search View Options: Default Products Per Page & Results Per Page Droplist Options
- List / Gallery View – This toggles between the list and gallery views. The gallery view uses product cards in a grid and the list view uses a more traditional table view.
- Product Image – This pulls from the product thumbnail field.
- Product Name – This pulls from Sage’s extended description by default with a fallback to the short description.
- Product History – This section of the product card displays information based on the logged in account. It gives information on how much, how recently, and how often a user orders a specific item.
- Product Price – Pulled from Sage’s standard unit price. Supported customer specific pricing is applied here, ensuring customers see their prices for your items.
- You Save Percentage – This shows the customers discount from the suggested retail price.
- Add to Cart with Quantity input – This allows customers to order in whatever quantity you want them to. There are settings at the product level which control how users are allowed to order, for example you can set the minimum or maximum quantity a customer is allowed to by.
- Add to Favorites List – This button adds an item to a favorites list. Opens modal where you can select which list to save the item to.
- SKU – This is your item code from Sage. It is a unique identifier for products.
- Search Field Display – This display shows data stored in searchfield 1 and 5 with the labels category and brand.
Items not shown in image:
- Sort By Drop List – This allows a user to choose the order they want to see the product catalog in. By default we provide sorting by SKU and name both ascending and descending as well as the product position field. The application also has settings to control the default sorting behavior.
- Dangerous Goods Display – This allows you to set a dangerous goods display on your products. This shows a warning icon and a link to a popup where you can add additional information about how you handle dangerous goods including any fees associated with shipping/handling.
- Recently Viewed Products – This keeps track of the items a users has viewed and displays them in a grid at the bottom of the search results.
- Inventory Display – Through the use of Inventory Display Profiles (IDP) you can manage what inventory information you display to customers. Here you can tell the site to show the product’s exact inventory or a simple ‘In Stock’ message. You can also control if users will be able to purchase out of stock items.