
Overview
This article walks you through setting up a new customer site, from creating the site to launching it on your own domain. In CIMcloud, each of your websites is called a customer site (you may also hear the older name, “snapsite” referenced in discussions). One CIMcloud platform can run several customer sites, each with its own design, products, and settings.
Important: You can’t copy or clone an existing customer site. Every new site is set up from scratch using the steps below.
Note: Adding customer sites may change your software or monthly fees, depending on the bundles you own. If you have questions, submit a support task before you begin.
Before you begin
Answer these questions first. Your answers decide which steps apply to you.
- Will the new site show different products, categories, or menu links than your other sites? If yes, you’ll use Data Rights (Part 2).
- Will it need different shipping methods? (Part 7)
- Will it need its own merchant account for credit cards? (Part 7)
- Should certain customers be limited to this site only? (Part 5)
- What domain name will the site use when it goes live? (Part 9)
Where you’ll work
Most steps happen in the Worker Portal, mainly in two workspaces:
- Settings Workspace – site settings, data rights, shipping, and features.
- CRM Workspace – accounts, contacts, and customer groups.
Some steps also happen in your ERP, because accounts and most products sync from your ERP into CIMcloud.
Part 1: Create the site
Step 1. Add the new site
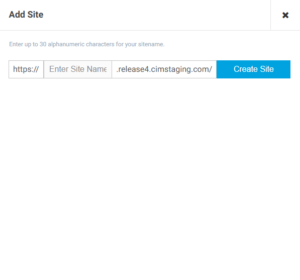
- Go to Settings Workspace > Customer Site Settings > Customer Sites.
- Click + Add Site in the top-right corner.
- Enter a site name. Use up to 30 letters and numbers (a–z, 0–9), with no spaces or symbols.
- Click Create Site.
Choose the name carefully. It can’t be changed after the site is created. It becomes part of the site’s temporary/test web address until you set up your own domain.

Step 2. Configure the General Settings
After you click Create Site, the site’s General Settings page opens. Fill in each section, then click Save Customer Site.
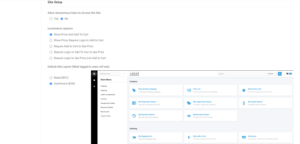
Site Setup
- Allow Anonymous Users to Access the Site – Choose Yes if visitors can browse without signing in. Choose No to require a login for the whole site.
- Ecommerce Options – Choose when visitors see prices and can add items to their cart:
- Show Price And Add To Cart
- Show Price, Require Login to Add to Cart
- Require Add to Cart to See Price
- Require Login or Add To Cart to See Price
- Require Login to See Price and Add to Cart
- Default Site Layout – Choose what signed-in users see:
- Retail (B2C) – a storefront layout, best for shopping.
- Dashboard (B2B) – a portal layout, best for business customers who reorder, track orders, and pay invoices.
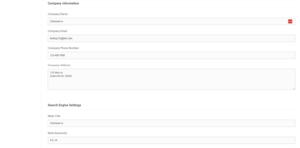
Company Information
Enter the company name, email, phone number, and address you want to show on this site. The address also appears in system emails sent from this site.
Search Engine Settings
Enter the Meta Title, Meta Keywords, and Meta Description for the site. These help search engines like Google describe your site in search results.
Part 2: Separate content with Data Rights
Skip this part if the new site will show the same products, categories, and menu links as your other sites.
A Data Right is a group of records, such as products, categories, navigation links, or shipping methods. You apply a Data Right to a site or to a group of customers to control what they see.
How Data Rights behave by default
- Products and categories that aren’t in any Data Right show to everyone.
- Shipping methods that aren’t in any Data Right show to no one.
Because of this, plan Data Rights for every site, not only the new one. For example, if the new site gets a Data Right with its own products, your main site needs a Data Right with its own products too. Otherwise, content may show on the wrong site.
Step 3. Create the Data Rights you need
Create one Data Right for each group of content you want to keep separate, for example “Site B Products” or “Site B Navigation.” For full instructions, see Data Rights.
Step 4. Apply each Data Right
You can apply a Data Right in two places:
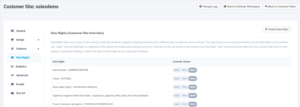
To a whole customer site (everyone who visits the site):
- Go to Settings Workspace > Customer Site Settings > Customer Sites.
- Click Edit next to the site.
- Open the Data Rights tab.
- Next to each Data Right, choose Apply.
To a customer group (specific accounts on a site):
- Go to CRM Workspace > Customers > Customer Groups.
- Click Edit next to the group.
- Open the Data Rights tab and apply the Data Rights you need.
To hide content from a site or group instead, choose Deny next to that Data Right. Leave it on Inherit to keep the default.
Learn more about groups in Customer Groups.
Part 3: Add categories, products, and images
Skip this part if the new site will use the same categories and products as your other sites.
Step 5. Add product categories
- Create the categories the new site needs. See Create Product Categories.
- Add those categories to the new site’s Data Right (Part 2).
Step 6. Add products
CIMcloud uses two kinds of products:
| Product type | What it is | Where you create it |
| Parent product | A grouping that holds related items (for example, one shirt in many sizes). It exists only in CIMcloud. | CIMcloud Worker Portal |
| Child product | The actual item a customer buys. | Your ERP, which then syncs it to CIMcloud |
For parent products:
- Create the parent product in CIMcloud.
- Add it to the right category.
- Add it to the new site’s Data Right.
For child products:
- Create the product in your ERP.
- Wait for it to sync into the CIMcloud Worker Portal.
- Enable the product and add it to the new site’s Data Right.
You can do this one product at a time in the Worker Portal, or for many products at once with a CSV spreadsheet import. See:
- Adding and Updating Products
- Managing Data Through Spreadsheet Imports
- Import Templates for Common Imports
Step 7. Upload product and category images
- Upload images for any new products and categories.
- Link each image to its product or category.
You can link images one at a time in the Worker Portal, or in bulk with a CSV import (see the import articles above).
Part 4: Set up navigation and pages
Step 8. Add navigation links
If the new site needs different menu links than your other sites:
- In the Content Workspace, add the links to the right menu.
- Add those links to the new site’s Data Right, so they only show on that site.
See Understanding Customer Site Navigation Menus and Configure Navigation Links.
Step 9. Create site-specific pages (optional)
If the new site needs its own version of a page, such as a different About Us page, create that page in the Content Workspace and link it from the new site’s menu.
Part 5: Set up customers and access
CIMcloud uses two terms for customers:
- An account is a customer company. In your ERP, it’s called a customer. Accounts sync from your ERP into CIMcloud.
- A contact is a person’s login on the site. Contacts belong to an account and exist only in CIMcloud.
Step 10. Create accounts in your ERP
If the new site will have new customer companies, create them in your ERP. They sync into the CIMcloud Worker Portal automatically. Once they appear, add them to a customer group if needed (Part 2).
Step 11. Create contacts (logins)
Add contacts to each account so people can sign in. You can create contacts one at a time in CRM Workspace > Customers > Contacts, or upload many at once with a CSV import.
See Create Contacts, Managing Data Through Spreadsheet Imports, and Import Templates for Common Imports.
Step 12. Limit customers to one site (optional)
By default, every account and contact can sign in to every customer site. To limit some customers to one site:
- Ask your CIMcloud Account Manager to turn on site access control. You can’t turn this on yourself.
Part 6: Design the site
Step 13. Set the site’s look
Each customer site can have its own logo, colors, fonts, home page layout, and Retail or Dashboard template. To set these, go to Settings Workspace > Customer Site Settings > Customer Sites, click Edit next to the site, and open the Design tab.
See Customer Site Design Settings. For the Retail site header, see Configurable Retail Header Template.
Step 14. Add custom code (advanced, optional)
If someone on your team writes CSS or JavaScript, you can add custom code to just this site from the site’s Advanced tab. See Customer Site Settings – Advanced Section and Custom Code Guidelines and Standards for Customers.
Part 7: Set up shipping, payments, pricing, and emails
Step 15. Choose shipping methods
If the new site needs different carriers or shipping charges than your other sites:
- Add the site’s shipping methods to a Data Right for that site.
- Apply the Data Right to the site (Part 2).
- Check the cart on each site to confirm the right shipping methods appear.
Remember, a shipping method that isn’t in any Data Right won’t show on any site. See Managing Shipping Methods & Shipping Costs.
Step 16. Decide on a merchant account
If you accept credit cards, decide whether the new site should use its own merchant account. If yes, submit a support task to your CIMcloud Account Manager. Multiple merchant accounts need extra planning and scoping with CIMcloud.
Step 17. Apply pricing overrides
If your pricing overrides should also apply on the new site, the Applies to all snap sites setting must be Yes on each pricing override. Ask your CIMcloud Account Manager to update this setting for you.
Step 18. Set up system emails
Each site can send system emails (such as order confirmations) with its own From name and address, subject lines, and CC/BCC addresses.
- Go to Settings Workspace > Customer Site Settings > Customer Sites.
- Click Edit next to the site and open the Emails tab.
- Fill in the fields you want to change for this site.
Don’t see an Emails tab? Site-specific emails need to be turned on by CIMcloud first. Submit a support task to request it.
The email message body is the same on every site. If you need a different message body per site, CIMcloud can scope this as a custom request. See Configuring System Email Settings.
Part 8: Turn features on or off
Step 19. Review feature settings
Feature settings are applied in layers. A lower layer overrides the one above it:
- Application Settings – the default for all sites.
- Customer site – overrides the default for one site.
- Customer group – overrides the site for specific accounts.
To set up the new site:
- Review the feature settings in Application Settings and note which features the new site does or doesn’t need.
- Edit the new site and turn those features on or off in its Features tab.
- If some accounts on the site need different features, set them on a customer group instead.
See Features & Settings Basics.
Part 9: Go live
Step 20. Test the site
Before launch, sign in as a test contact on the new site and on your other sites. Check that each site shows the right products, categories, menu links, prices, and shipping methods.
Step 21. Set up your domain
Choose the domain name the new site will use, such as shop.yourcompany.com. Then follow Planning Your Go-Live Strategy and Launching Your Website.
Sitemaps
All your customer sites share one sitemap by default. If you need a separate sitemap for each site, submit a support task. This is a custom request that your CIMcloud Account Manager will scope with you.
When to contact CIMcloud
Some steps need help from CIMcloud. Submit a support task when you need to:
| You want to… | Step |
| Ask how a new site affects your fees | Overview |
| Use a separate merchant account | Step 16 |
| Apply pricing overrides to all sites | Step 17 |
| Turn on site-specific emails, or change the email body per site | Step 18 |
| Limit customers to one site | Step 12 |
| Get a separate sitemap per site | Part 9 |