Overview
“Migration” is the term we use to describe moving a customer from a “Classic” version of the Website Pipeline or CIMcloud platform to the latest version of the CIMcloud platform. This article provides an overview of the stages of work involved in a typical migration project, from reserving your spot in line to the live roll-out of your solution on the latest version of the CIMcloud platform. It also includes some additional information to help you know what to expect as you plan and execute this (mostly) self-service implementation project.
This article includes the following 3 major parts:
- Part 1 – Process Overview
- Part 2 – Key Things To Expect
- Below covers a summary of key assumptions that you need to know to have success on your project.
- More details can be found in this Key Things to Expect article.
- Part 3 – Process Details
- Stage 0: Preparation
- Stage 1: Getting Connected
- Stage 2: Implementation
- Stage 3: Live Roll-out
- Stage 4: Project Closeout
Video Overview
Part 1 – Process Overview
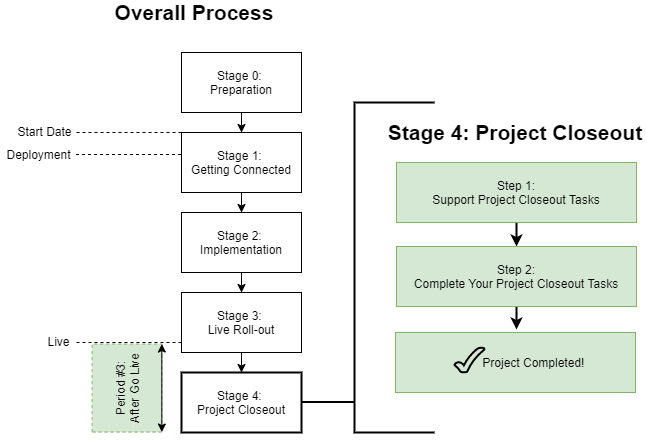
There are 5 stages in the typical migration process. The time it takes to get through each stage largely depends on 1) your engagement level in the process, and 2) how much “Extra Work” you decide to take on during the migration process.
The 5 Stages & 3 Time Periods
This is a visual overview of the 5 stages of the project. More details on the steps within each stage are included in the “Process Details” sections below. It also includes a cross-reference of the 3 content-management time periods you move through during the project. You can reference this article for more details on the content-management time periods (including diagrams showing the sequence of events).

Part 2 – Key Things To Expect
There are several key assumptions that you need to know and understand to successfully execute your Classic-to-Current Migration project.
Below is a summary of the items that are covered in more detail in this Key Things To Expect On Your Migration (Classic-to-Current) Project article.
- The Migration Process – The article you are reading right now is covering the 5 stage process.
- Content Management Time Periods (Sequence Diagrams) – There are 3 content management time periods you move through during the project.
- Self-Service (It’s On You) – This is a self-service project. You are expected to plan, manage, and execute it yourself (or contract with a 3rd party implementation partner if you need any help).
- Things Have Changed (To Self-Service) – We used to require a paid, heavy hand-holding pro services engagement to implement our platform. We totally shifted to the self-service. Please plan accordingly.
- Need Help? – We have several ways you can get help when you need it.
- The Four (4) Things You Must Do – If you are starting or restarting your migration efforts, make sure you do these four things right away (they will set you up for success).
- Platform / Feature Changes – We hope you’ll love the changes we made to the new platform, but also understand that any change can take some getting used to. We also want you to be aware of a few known take-aways. Understanding they key changes can help your team better prepare for an impact it has on their work.
- Data/Content/Image/File Management – Because the migration project has an overlap period where two separate platforms (old and new) are running at the same time, there is a deliberate content management strategy that has to take place to keep both platforms up to date and accurate.
- Extra Work – There are six (6) major categories of extra work that we see come into play on migration projects. We recommend deferring the extra work if you can. If not, you need to understand the impact it will have on process, lead-times, and costs.
- Typical Lead-Times – There are several factors that impact your lead-time. Your project manager and planner will want to understand them when establishing a plan and schedule. One of the key factors is understanding which “wave” your migration is scheduled to start in (and what you can do now to get ahead).
Part 3 – Process Details
Stage 0: Preparation
Diagram
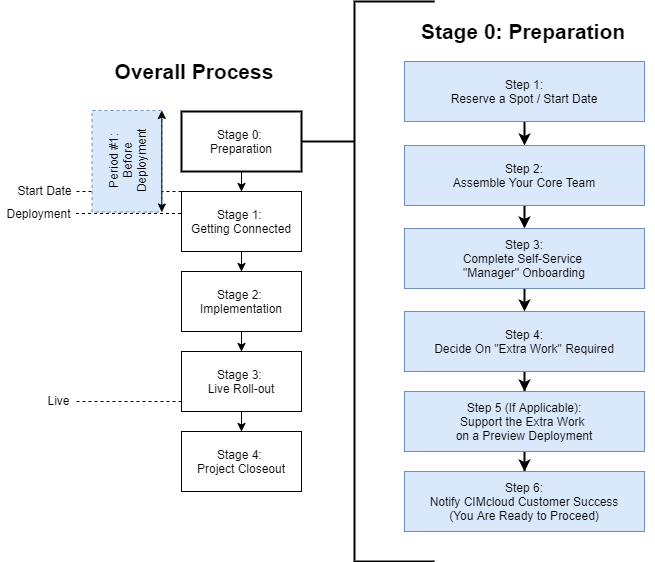
Step Details
- Step 1: Reserve a Spot / Start Date
- Task #1: Let us know you are interested in a migration! Enter a task and a member of our team will reach out to discuss next steps.
- By reserving a spot, you get in line for a start date and can proceed with the rest of the steps in Stage 0.
- Step 2: Assemble Your Core Team
- The below 5 roles are described in article.
- Task #2: Identify the Five (5) Critical Roles
- The two (2) heavy-lifting roles are: Project Manager and Lead Implementer
- The Program Manager will mainly be involved in deciding on “extra work” (if applicable)
- These two supporting roles will only be requested if needed by CIMcloud (sometimes they are needed to complete the ERP Sync Tool install during deployment):
- IT / Network Admin Expert
- ERP / Financial Data (& Business Process) Expert
- Step 3: Complete the Manager Onboarding Checklists (each role)
- Task #3: Complete the Program Manager Onboarding Checklist
- Task #4: Complete the Project Manager Onboarding Checklist
- Step 4: Decide on The Extra Work That Is Required
- Task #5: Decide If/What Extra Work Will Be Part of Your Migration Project
- Task #6: Make Sure Your Project Manager Includes the Extra Work in Your Project Plan
- This article explains how extra work could impact your lead-time (this is needed for the plan).
- Note: A CIMcloud product manager will notify you if there are any known fringe product use cases (this is 1 of the 6 categories of extra work that could apply) in your scope that might impact your Start Date.
- Step 5 (if applicable): Support The Extra Work on a Pre-Deployment Site
- This is typically applicable if you choose to migrate custom modifications to the latest CIMcloud platform (the custom modifications will be adapted, installed, and tested in the pre-deployment site so they are ready when the migration project officially starts).
- Step 6: Notify CIMcloud Customer Success
- Task #7: Notify Your CIMcloud Customer Success Manager When All Prep Is Done
- This unlocks CIMcloud to proceed on the Start Date of your migration project.
Stage 1: Getting Connected
Timeline
- Prerequisites: Stage 0 Items Are Complete
- Starts: Official Kickoff Date
Diagram
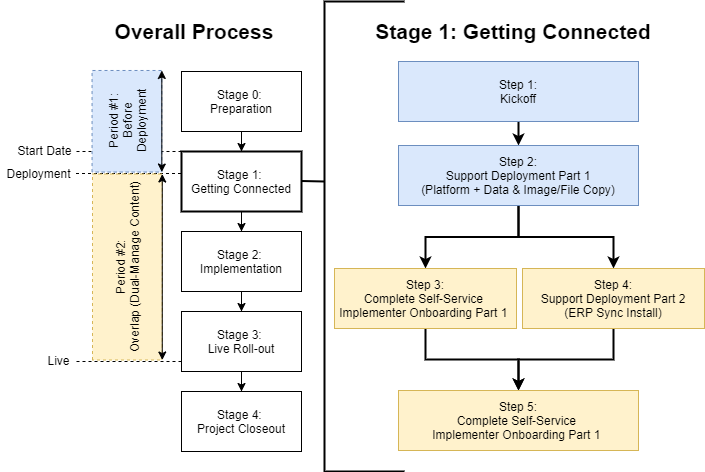
Step Details
- Step 1: Kickoff
- CIMcloud schedules the work and internally prepares for our part of the work.
- Step 2: Support The Deployment + Data Copy #1 + Image / File Copy #1
- CIMcloud will complete this part.
- Your IT / Network Admin Expert and/or ERP / Financial Data (& Business Process) Expert may be needed to assist with access to your server (to install the ERP Sync Tool and get data syncing) and/or to answer configuration / data questions related to the ERP Sync setup.
- There are two variations to the ERP Sync Tool deployment, depending on your ERP system:
- Variation #1: CIMcloud will complete the Standard ERP Connector work (Sage 100).
- Variation #2: [Additional Pricing Applies] CIM Pro Services will complete 3rd Party ERP Connector work (including Sage 300, Sage 500, Sage X3, Microsoft Dynamics GP, and Microsoft Dynamics AX)
- You will be notified when this step is completed.
- At that point, your “Dual-Management of Content” (data and image/file) responsibilities start.
- Please take note of that date and plan accordingly.
- Click here for more details on Content (Data, Images, Files) Migration and Ongoing Management.
- Step 3: Implementer Onboarding Part 1 + Dual-Management of Content
- Task #8: Provide CIMcloud with the Email Address of the Platform Admin Worker
- CIMcloud will turn over the new platform to your Lead Implementer
- CIMcloud will set the email on the Admin Worker Login and send a password reset allowing the Lead Implementer to login into the Worker Portal on the new platform for the first time.
- Step 4: Implementer Onboarding
- Task #9: Complete the Lead Implementer / Operator Onboarding Checklist
Stage 2: Implementation
Important Note
Note: You will continue dual-management of content responsibilities (on your live classic platform + the new CIMcloud platform) throughout all of Stage 2. This includes everything in the Content Workspace (nav links, web pages, images, files, etc), Product Workspace (products, categories, product-to-category assignments, product-related data from add-on bundles / features, etc), and Settings Workspace (tax settings, payment processing settings, shipping settings, etc).
Diagram
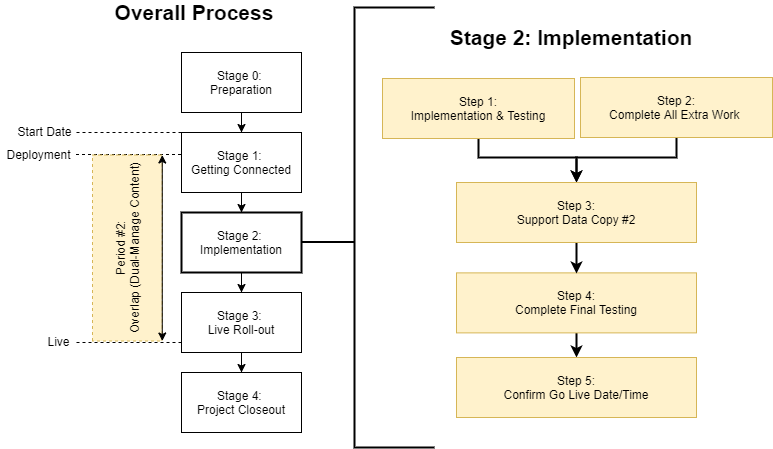
Step Details
- Step 1: Implementation & Testing
- Note: If you have any custom modifications (part of “extra work”) that impact standard CIMcloud functionality, your ability to complete the tasks below may be impacted until the custom modifications are completed and installed (note: you should also work with CIM Pro Services to determine if / how any of the standard tasks need to be altered).
- Task #11: Submit a Support Task with Your Data Copy #2 Date & Target Go Live Date
- A CIMcloud support specialist will need to actually run your Data Copy #2 (right before go live) as well as support any DNS (domain name) and SSL (security certificate) configurations for your live cutover. In addition, we will need to turn on monitoring services on the new site + turn off erp sync, monitoring services, etc on your old / classic site. We will also run Data Copy #3 directly after the go live cutover. Please provide as much advanced notice as practical so we can schedule resources to properly support your efforts.
- Task #12: Modify / Adjust Design Settings (if standard design template)
- Task #13: Modify / Add Custom Navigation Links
- Task #14: Migrate Your Superusers or Web Driver logins (if any) to Workers
- Plan & Create Worker Groups
- Create and Invite Worker Logins
- Create Power Customers / Contacts including their Customer Groups (add-on bundle required)
- Task #15: Test & Adjust Features & Settings
- Task #16: Complete Full Circuit Testing of All Pre-Existing Workflows (per your scope & classic site)
- CIMcloud’s migration process and data copy services are intended to get you 90%+ of the way towards your go live state.
- You will need to rigorously test, verify, and punchlist (where needed) all customer-facing and worker-facing workflows
- This article on Launching Your Website has a breakdown of questions and action items that you can use to identify your workflows and build your circuit testing plan.
- Test all payment processing (to make sure money makes it all the way to your bank accounts) and order fulfillment (actually go through your pick, pack, and ship process).
- Test, verify, and modify settings (if needed) on all system emails (including contact us, email a friend, order confirmation, invoice payment confirmation, new customer confirmation, username/password reset, etc)
- Address any data / content issues found (by making edits in the Worker Portal).
- Submit support tasks for any items that you need assistance from CIMcloud on.
- Step 2: Complete All Extra Work
- Additional Tasks: Complete all additional tasks, including thorough testing, for any additional work.
- This may include installation, content / configuration, testing, punchlisting, and stabilization efforts.
- Coordinate with CIMcloud Implementation Support if any fringe / product gaps were identified.
- Coordinate with CIM Pro Services for all custom modifications you are migrating (additional fees apply).
- Pro Services will work with you to complete any remaining development (not completed in Stage 0).
- Pro Services will work with you to complete the install and testing of the modifications.
- Step 3: Support Data Copy #2
- It is unlikely that you will have actions in this step, but CIMcloud will notify you if they need your input or assistance.
- CIMcloud will complete Data Copy #2 prior to Go Live. This will refresh the customer wallet-style data that was added or modified (by your customers on your classic site) since the Data Copy #1 was completed. This data is limited to just a handful of tables that are managed by your customers, including favorites lists, saved credit cards, contacts (including PW changes), shipping addresses, and other optional add-on features (if in scope) like ratings / reviews, non-guest checkout accounts, etc.
- Step 4: Complete Final Testing
- This article on Launching Your Website has a breakdown of questions and action items that you can reference to build your final testing plan.
- If you are replacing an existing ecommerce platform, we strongly recommend taking the risk assessment questionnaire and following the risk mitigation steps outlined in this Ecommerce Platform Replacement Risk Management article.
- Task #17: Verify SEO-Related Settings With an In-House or 3rd Party Expert
- Critical: If a material part of your online traffic / business comes from organic search engine rankings or other digital inbound traffic, it is critical that you have a plan to insure you minimize the risks to your organic rankings and other digital marketing efforts by taking industry best practices for a platform change / cutover. This includes (but is not limited to) 1) setting up and verifying site maps, 2) setting up and verifying search-engine friendly URLs and meta data for all products, categories, content, etc, and 3) setting up and verifying 301 URL redirects for any URLs that are indexed on your current classic platform but will not exist in the new platform. CIMcloud and CIM Pro Services do not provide SEO and marketing-related consulting, but we have other clients that use these types of resources and could potentially make a recommendation if you don’t have an expert in-house.
- This Search Engine Optimization (SEO) Checklists article has lots of suggestions that CIMcloud customers have found helpful.
- Task #18: Repeat Full Circuit Testing & Punchlisting of All Workflows
- You will need to rigorously test, verify, and punchlist (where needed) all customer-facing and worker-facing workflows.
- It is highly recommended that you have Workers (i.e. Customer Service Reps) place live orders (and invoice payments) through the new platform and verify any ERP syncing items synced correctly. All other customer and worker-facing workflows should also be tested with live transactions where practical.
- Address any data / content issues found (by making edits in the Worker Portal).
- Submit support tasks for any items that you need Implementation Support on.
- Address any custom modification punchlist or stabilization items with CIM Pro Services.
- Step 5: Confirm Go Live Date/Time
- Task #19: Update The Support Task To Finalize Your Go Live Date with CIMcloud
- Update the Go Live support tasks to confirm your Go Live Date / Time window.
- CIMcloud will confirm the date/time or request an adjustment if needed.
- CIMcloud will schedule a resource to complete our part of your live cutover (DNS and SSL configuration, shutting down the old sync tool & monitors, turning on new monitors, running Data Copy #3, etc).
- Task #20 (if applicable): Coordinate Go Live Date with CIM Pro Services for Custom Support
- If you have customizations (extra work), you will need to also coordinate the Go Live cutover date with CIM Pro Services so they can be on standby to address any support / stabilization issues that are revealed after the live cutover.
- Task #19: Update The Support Task To Finalize Your Go Live Date with CIMcloud
Stage 3: Live Roll-out
[Optional] Soft Launch / Gradual Rollout (Live Beta Test @ Pilot URL)
A soft launch (or gradual rollout) is an optional step that involves setting up the new site at a pilot domain name / URL (i.e. https://pilot.yourcompany.com) and inviting part of your workers and customers to use it in a series of 1 or more “live beta” phases. You will have two (2) live platforms during this step (your classic site + the new platform). This requires additional fees. It is the highly recommended rollout strategy to de-risk your go live if your classic platform meets any of these four criteria: 1) high traffic / volume, 2) highly business critical (represents 30% or more of your revenue), 3) has a large volume or complex custom modifications, or 4) have a large quantity or complex add-on bundles in use. If you have questions as to whether or not you should take this step, you should probably take it. If you still have questions, you can contact CIMcloud for additional input / recommendations to consider.
This article includes more details and specific recommended process steps to take on the Soft Launch (Gradual Rollout) Go Live Strategy.
Live Cutover
The live cutover event is when your domain name/URL is rerouted from your classic platform (that is being replaced) to the new CIMcloud platform.
Diagram
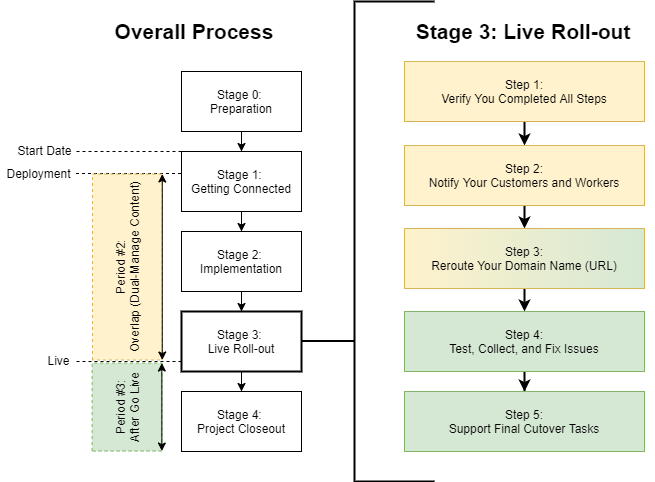
Step Details
- Step 1: Verify You Completed All Steps
- Task #21: Verify All Critical Testing, Punchlisting, and SEO-Related Steps Were Taken
- The replacement of any software or ecommerce platform has risks. The live cutover should only occur if you have adequately identified and addressed this risks. The above steps are intended to help you mitigate some of that risk that is typically seen and addressed by CIMcloud customers. The steps are focused on making sure the new platform is fully tested and ready (for all customer-facing and worker-facing workflows), and that you have taken steps to maintain any critical organic search or other marketing-related rankings (if applicable).
- See the Ecommerce Platform Replacement Risk Management article for more tools and tactics you can use to assess and mitigate your business risk when going live on your new platform.
- Step 2: Notify Your Customers and Workers
- Task #22: Notify Your Customer and Workers The New Beta Platform Is Going Live
- You may choose to notify some or all of your customers and workers that you are cutting over to a new platform. This is typically done via email and/or putting a message up on the new platform.
- It is recommended that you let them know the platform will be in a “beta” period after the live cutover and you would love to get any feedback (positive or negative) on the platform. This approach is similar to the way restaurants open for several weeks (or more) before having their official “Grand Opening”. This sets the expectation with customers that this is a work in progress and encourages feedback if they see any issues (and being part of the solution) instead of judgement day.
- Step 3: Reroute Your Domain Name (URL)
- Task #23: Change Your DNS Settings to Reroute (Point) Your Domain Name to The New Platform
- Follow the instructions provides by your implementation support specialist to reroute your domain from the old classic platform to the new CIMcloud platform.
- CIMclould will make the needed URL routing and SSL settings changes on our side.
- Task #24: Test / Verify The Domain Name Is Now Routing to The New Platform
- Task #23: Change Your DNS Settings to Reroute (Point) Your Domain Name to The New Platform
- Step 4: Test, Collect, and Fix Issues
- Task #25: Test The Major Workflows on the Domain Name to Verify No Issues
- Task #26: Collect Feedback from Workers and Customers and Address Issues
- Place a support task if you need CIMcloud assistance on any issues found.
- Notify CIM Pro Services if you find any issues associated with custom modifications.
- Step 5: Support Final Cutover Tasks
- Task #27: Verify CIMcloud Has Completed All Final Cutover Tasks & Support Any Efforts (if needed)
- CIMcloud will complete the following final cutover tasks and will notify you if any assistance is needed by your team (to access or complete any of the tasks below):
- Complete Data Copy #3 (for the final update of customer-entered wallet style data created or modified on the classic platform since Data Copy #2).
- Turn off the ERP Sync services on the classic platform.
- Turn off monitoring on the classic platform.
- Split out the ERP Sync configurations on the new platform into multiple services. This provides faster syncing services by multi-threading them. It is typically not done until now because you have two sync tool instances running during the overlap period.
- Turn on monitoring on the new platform.
- Handle in-house housekeeping items related to project / task tracking and financials.
- Be ready to respond to any live site support issues that come up.
Congratulations! At this point, you should be fully live on the new platform. You will now be in a live site support mode with CIMcloud and can submit Support Tasks at any time (for any reason). Your classic platform will remain online (with the sync turned off) for reference for a period of one month. In addition, The CIM Pro Services team will be available to help stabilize any custom modifications on your site (this typically lasts for 30 to 60 days past go live or when the development has completed the full circuit of usage).
Stage 4: Project Closeout
30 Days Post Go Live
Diagram
Step Details
- Step 1: Support Project Closeout Tasks
- Task #28: Verify CIMcloud Has Completed All Project Closeout Tasks & Support Any Efforts (if needed)
- CIMcloud will complete the following final cutover tasks and will notify you if any assistance is needed by your team (to access or complete any of the tasks below):
- Uninstall the Sync Tool that was connected to the classic platform.
- Take the classic platform down / offline.
- Handle in-house housekeeping items related to project / task tracking and financials.
- Be ready to respond to any live site support issues that come up.
- Step 2: Complete Your Project Closeout Tasks
- Task #29: Complete Any Project Closeout Tasks That You Have
- Your Project Manager should complete and closeout the project by handling any housekeeping, stakeholder notifications, post-project reports, etc.
- Task #30: Take Your Project Team Out For a Beer!
Post Live Check-in
CIMcloud welcomes any / all feedback related to your experiences with the project and how we can improve our platform and/or services. If you have feedback or anything needs additional attention, a Customer Success Manager is available for post live check-ins. Just let us know.