This article is for customers on legacy versions of the platform that use the WebDriver. For customers on newer versions of the CIMcloud platform that use the Worker Portal, see How to Manage Record Counts (for SL-500).
Overview
This article provides a guide for disabling/deleting records to stay under the record count caps for Service Level 500 (Small Business Edition / SL-500).
The Small Business Edition is capped at 500 transactions per month and has record count caps for data storage. You can disable/delete records to say under the cap or move up to our standard edition / SL-1000. For more information, see Service Levels.
This article provides instructions for managing record counts directly in the WebDriver as well as in bulk through spreadsheet (CSV) data import/exports.
In the WebDriver
Note: For updating large amounts of data, we recommend disabling records using a spreadsheet (CSV) import for efficiency.
Products (cap of 10,000)
- Navigate to the Product Catalog Manager > Products > Manage.
- Note the number of enabled products by filtering on “Status” and viewing the record count
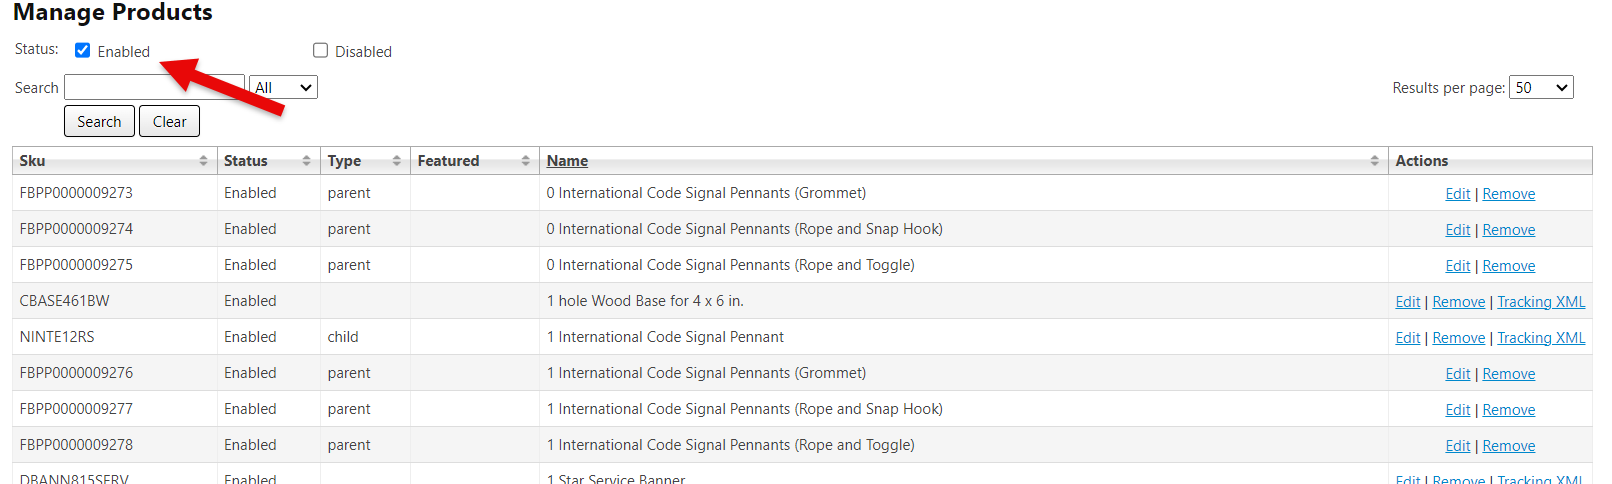
- Results at bottom of page

- Disable products by clicking “Edit” under the “Actions” column and setting the “Status” to “Disabled”
**Note: many of our customers manage their product statuses using a custom mapping to a field in their ERP system. This requires updating the data within your ERP and allowing the status to sync to the website.
Accounts (cap of 10,000)
- Navigate to Customer Manager > Accounts > Manage
- Similar to Products above, note the number of enabled accounts by filtering on “Status” and viewing the record count
- Disable accounts by clicking “Edit” under the “Actions” column and setting the “Status” to “Disabled”
Customers (cap of 10,000)
- Navigate to Customer Manager > Customers > Manage
- Similar to Products above, note the number of enabled customers by filtering on “Status” and viewing the record count
- Disable customers by clicking “Edit” under the “Actions” column and setting the “Status” to “Disabled”
Addresses (cap of 10,000)
- Navigate to Customer Manager > Addresses > Manage
- Similar to Products above, note the number of enabled addresses by filtering on “Status” and viewing the record count
- Disable addresses by clicking “Edit” under the “Actions” column and setting the “Status” to “Disabled”
Using Spreadsheet (CSV) Data Imports/Exports
Each of the data tables above can be managed through spreadsheet (CSV) data import/exports. This allows you to export all records from the desired table into a CSV file, as well as update / delete records by importing a CSV file.
It is important to first read and understand how to use data imports/exports via the following article before attempting to make changes, as this tool allows updating/deleting large amounts of data – Managing Data Through Spreadsheet Imports.
In the WebDriver, navigate to Data Uploads and Downloads > Imports/Exports > Manage.
The following grid provides the database table, user key, and status column needed to disable records by setting the status to ‘0’.
| Data to Manage | Table Name | User Key | Status Column |
|---|---|---|---|
| Products | products | sku | status |
| Accounts | accounts | ref_id | status |
| Customers / Contacts | customers | username | status |
| Addresses | shipping_addresses | id | status |
For example, the CSV file linked below could be imported to the “products” table to disable a product with the SKU “abc”: